 Tailored School
1. Sign in and first password
Open the school portal address given by the administrator. On the login page choose Staff Portal.
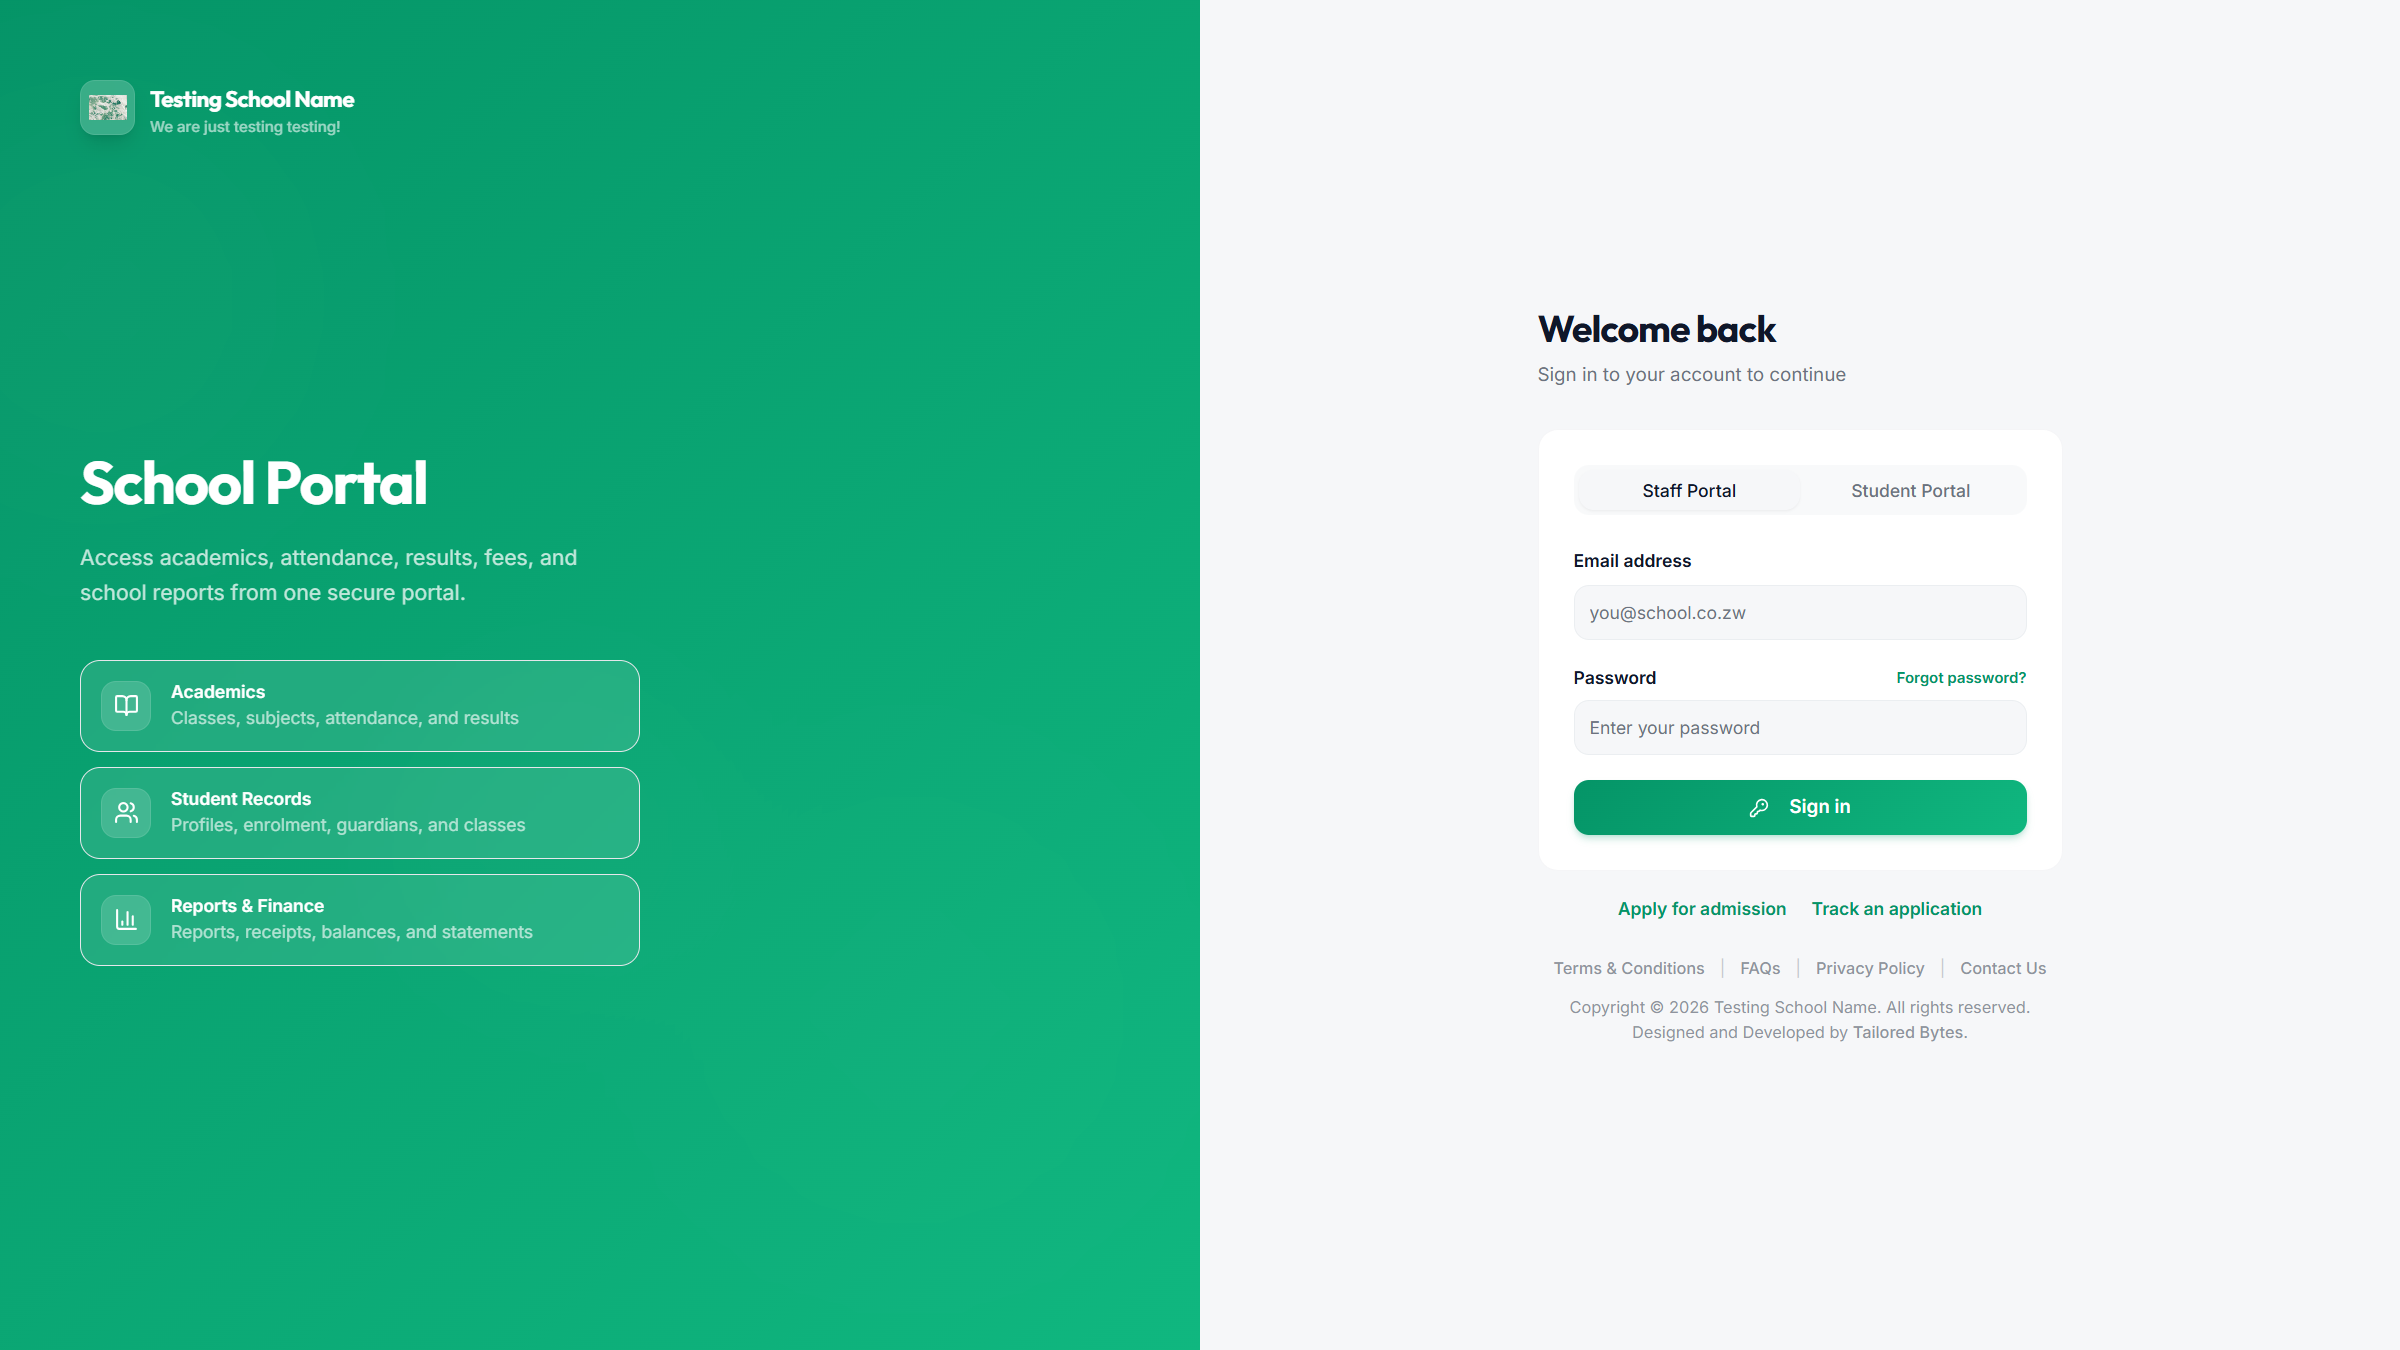
- Enter the email the school created for you — not a shared office address if you can avoid it.
- Enter your password. On first login this is the temporary password from the office.
- Choose Sign in.
- If the portal asks you to change your password, choose a private one and do not reuse a banking password.
2. Find your way around
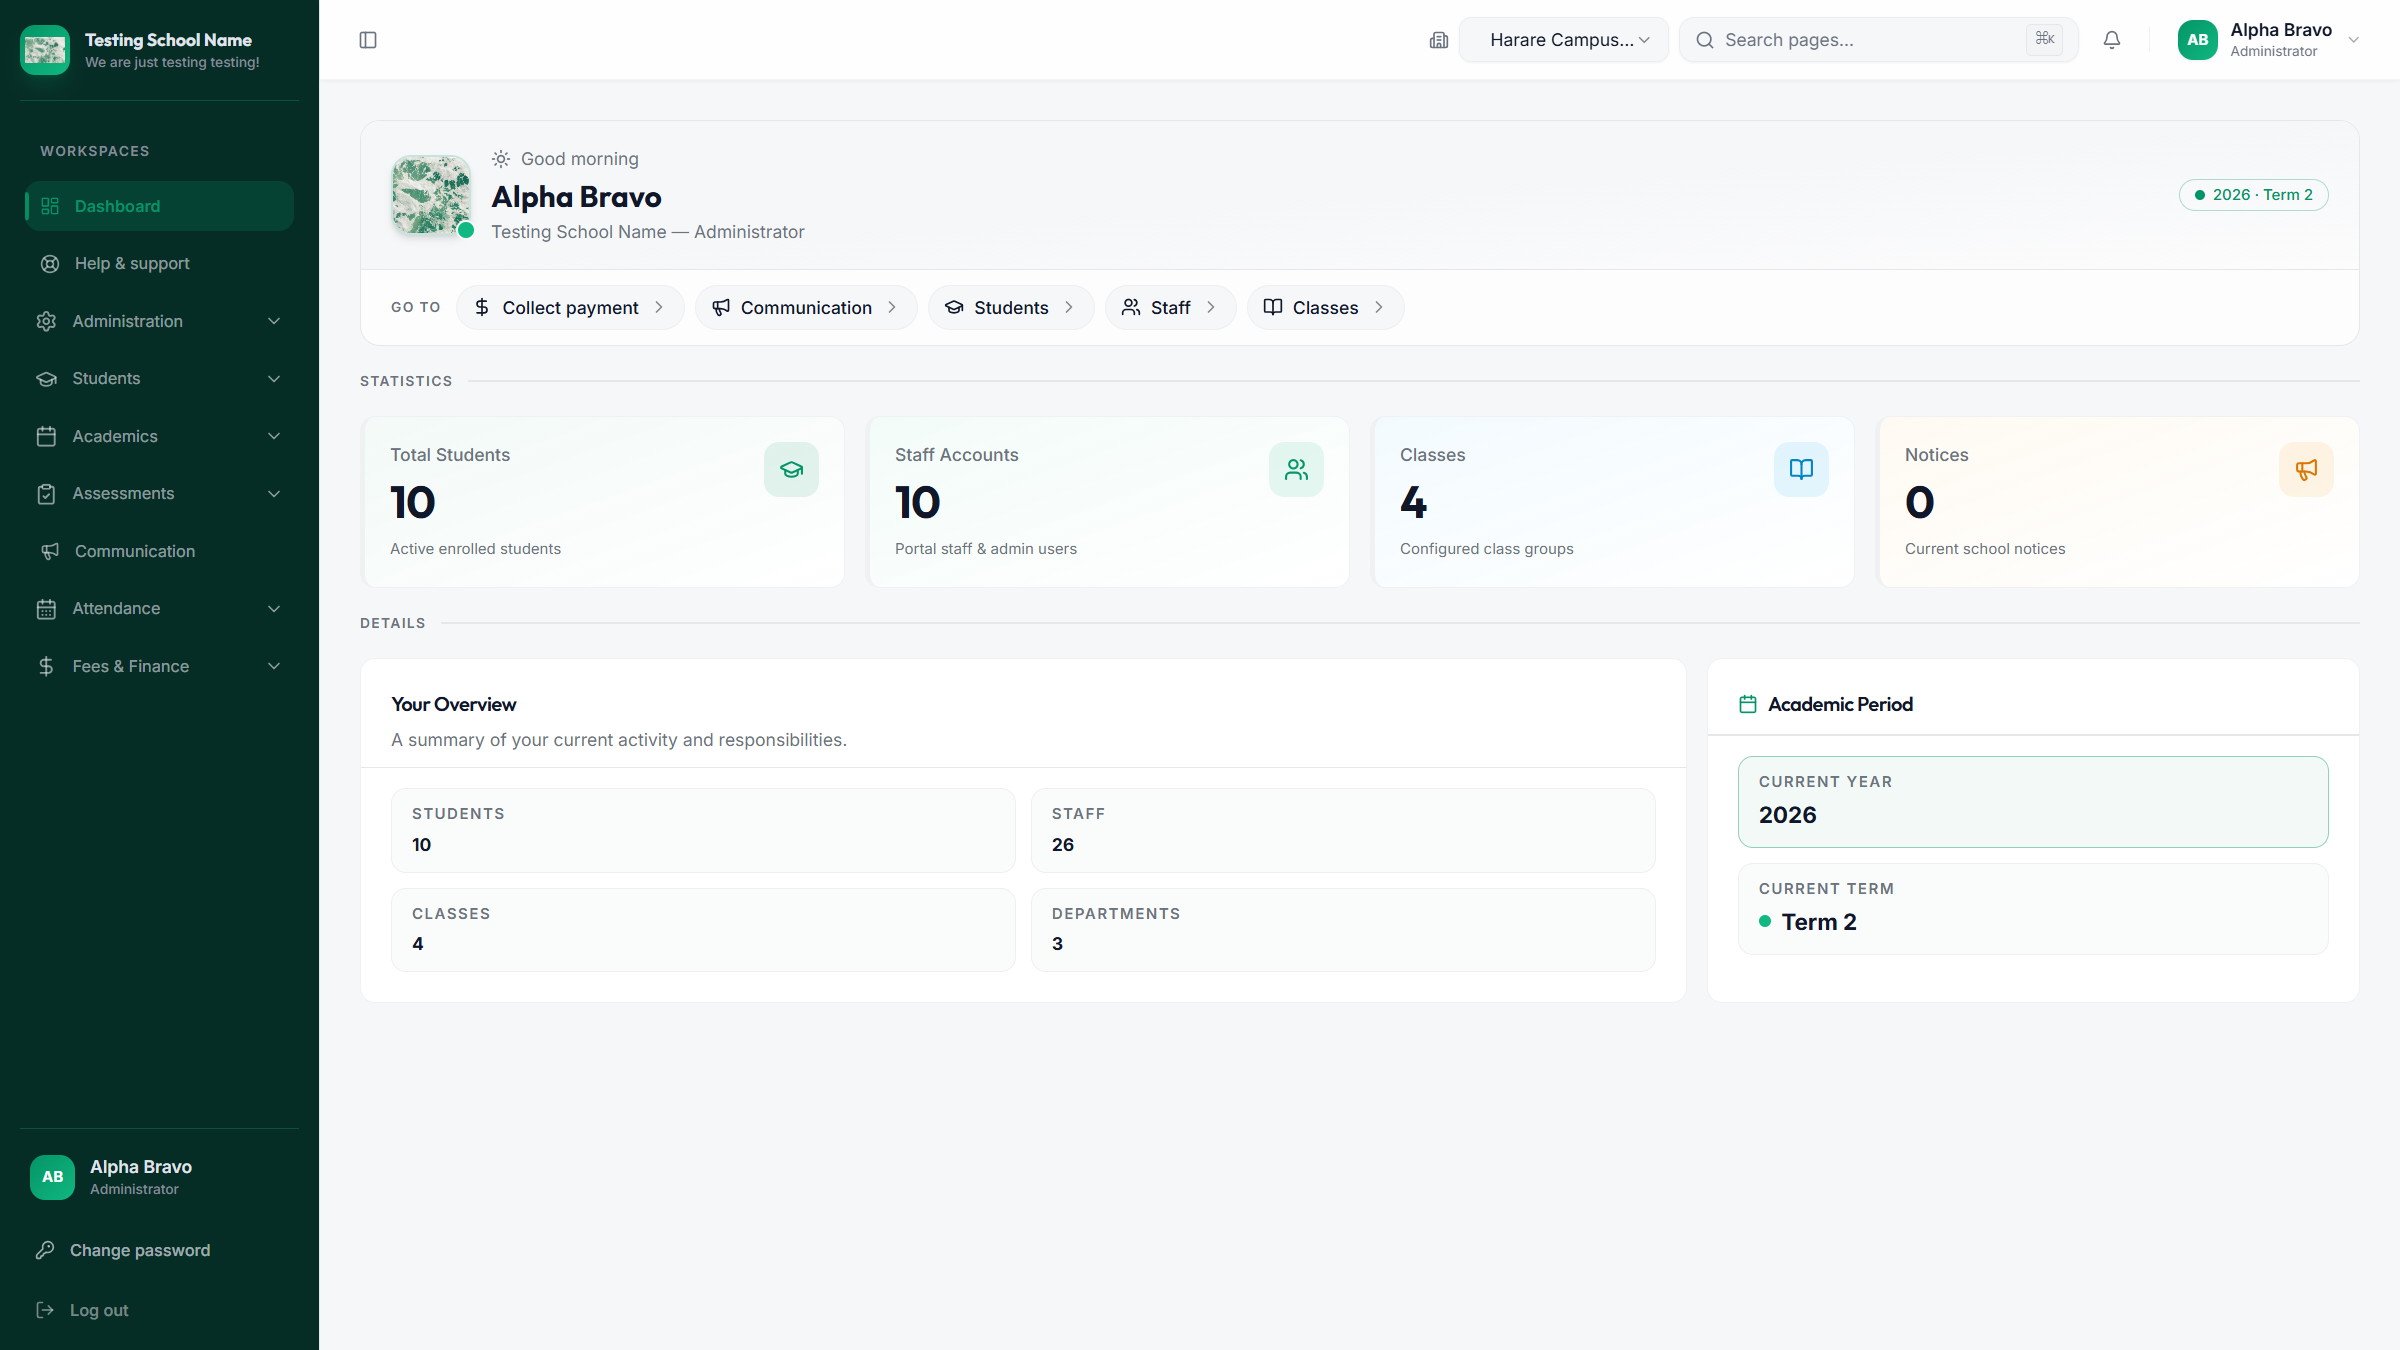
| Area | What it is for |
|---|---|
| Left menu | Only shows modules your school has enabled and your role is allowed to use. |
| Campus selector | On a multi-campus school, pick the site you are working on before you register a learner or take a payment. |
| Search pages | Jump to a screen by name instead of opening every menu. |
| Change password / Log out | At the bottom of the sidebar and under your name. |
| Help & support | Raise a school support ticket from inside the portal. |
Accounts and cash-desk users often land on Cash desk rather than the full dashboard. Use Full finance workspace when you need invoices or reports.
3. What each role can do
| Role | Typical work |
|---|---|
| Administrator | Staff users, school settings, students, academics, fees, notices, modules. |
| Admin view only (Owner) | See school data without changing staff or finance setup. |
| Headmaster | School overview, admissions, academic calendar, notices, reports. |
| Head of Department | Department classes, attendance, assessments for their area. |
| Teacher | Assigned classes, attendance, classwork, exam marks, student files they are allowed to see. |
| Accounts | Fee setup (with admin), invoices, payments, reminders, finance reports. |
| Cash desk | Look up a learner, record a payment, print or download the receipt. |
If a menu item is missing, you either do not have that role or the school has not enabled that module. Ask the administrator — do not borrow someone else’s login.
4. Students
Find and register
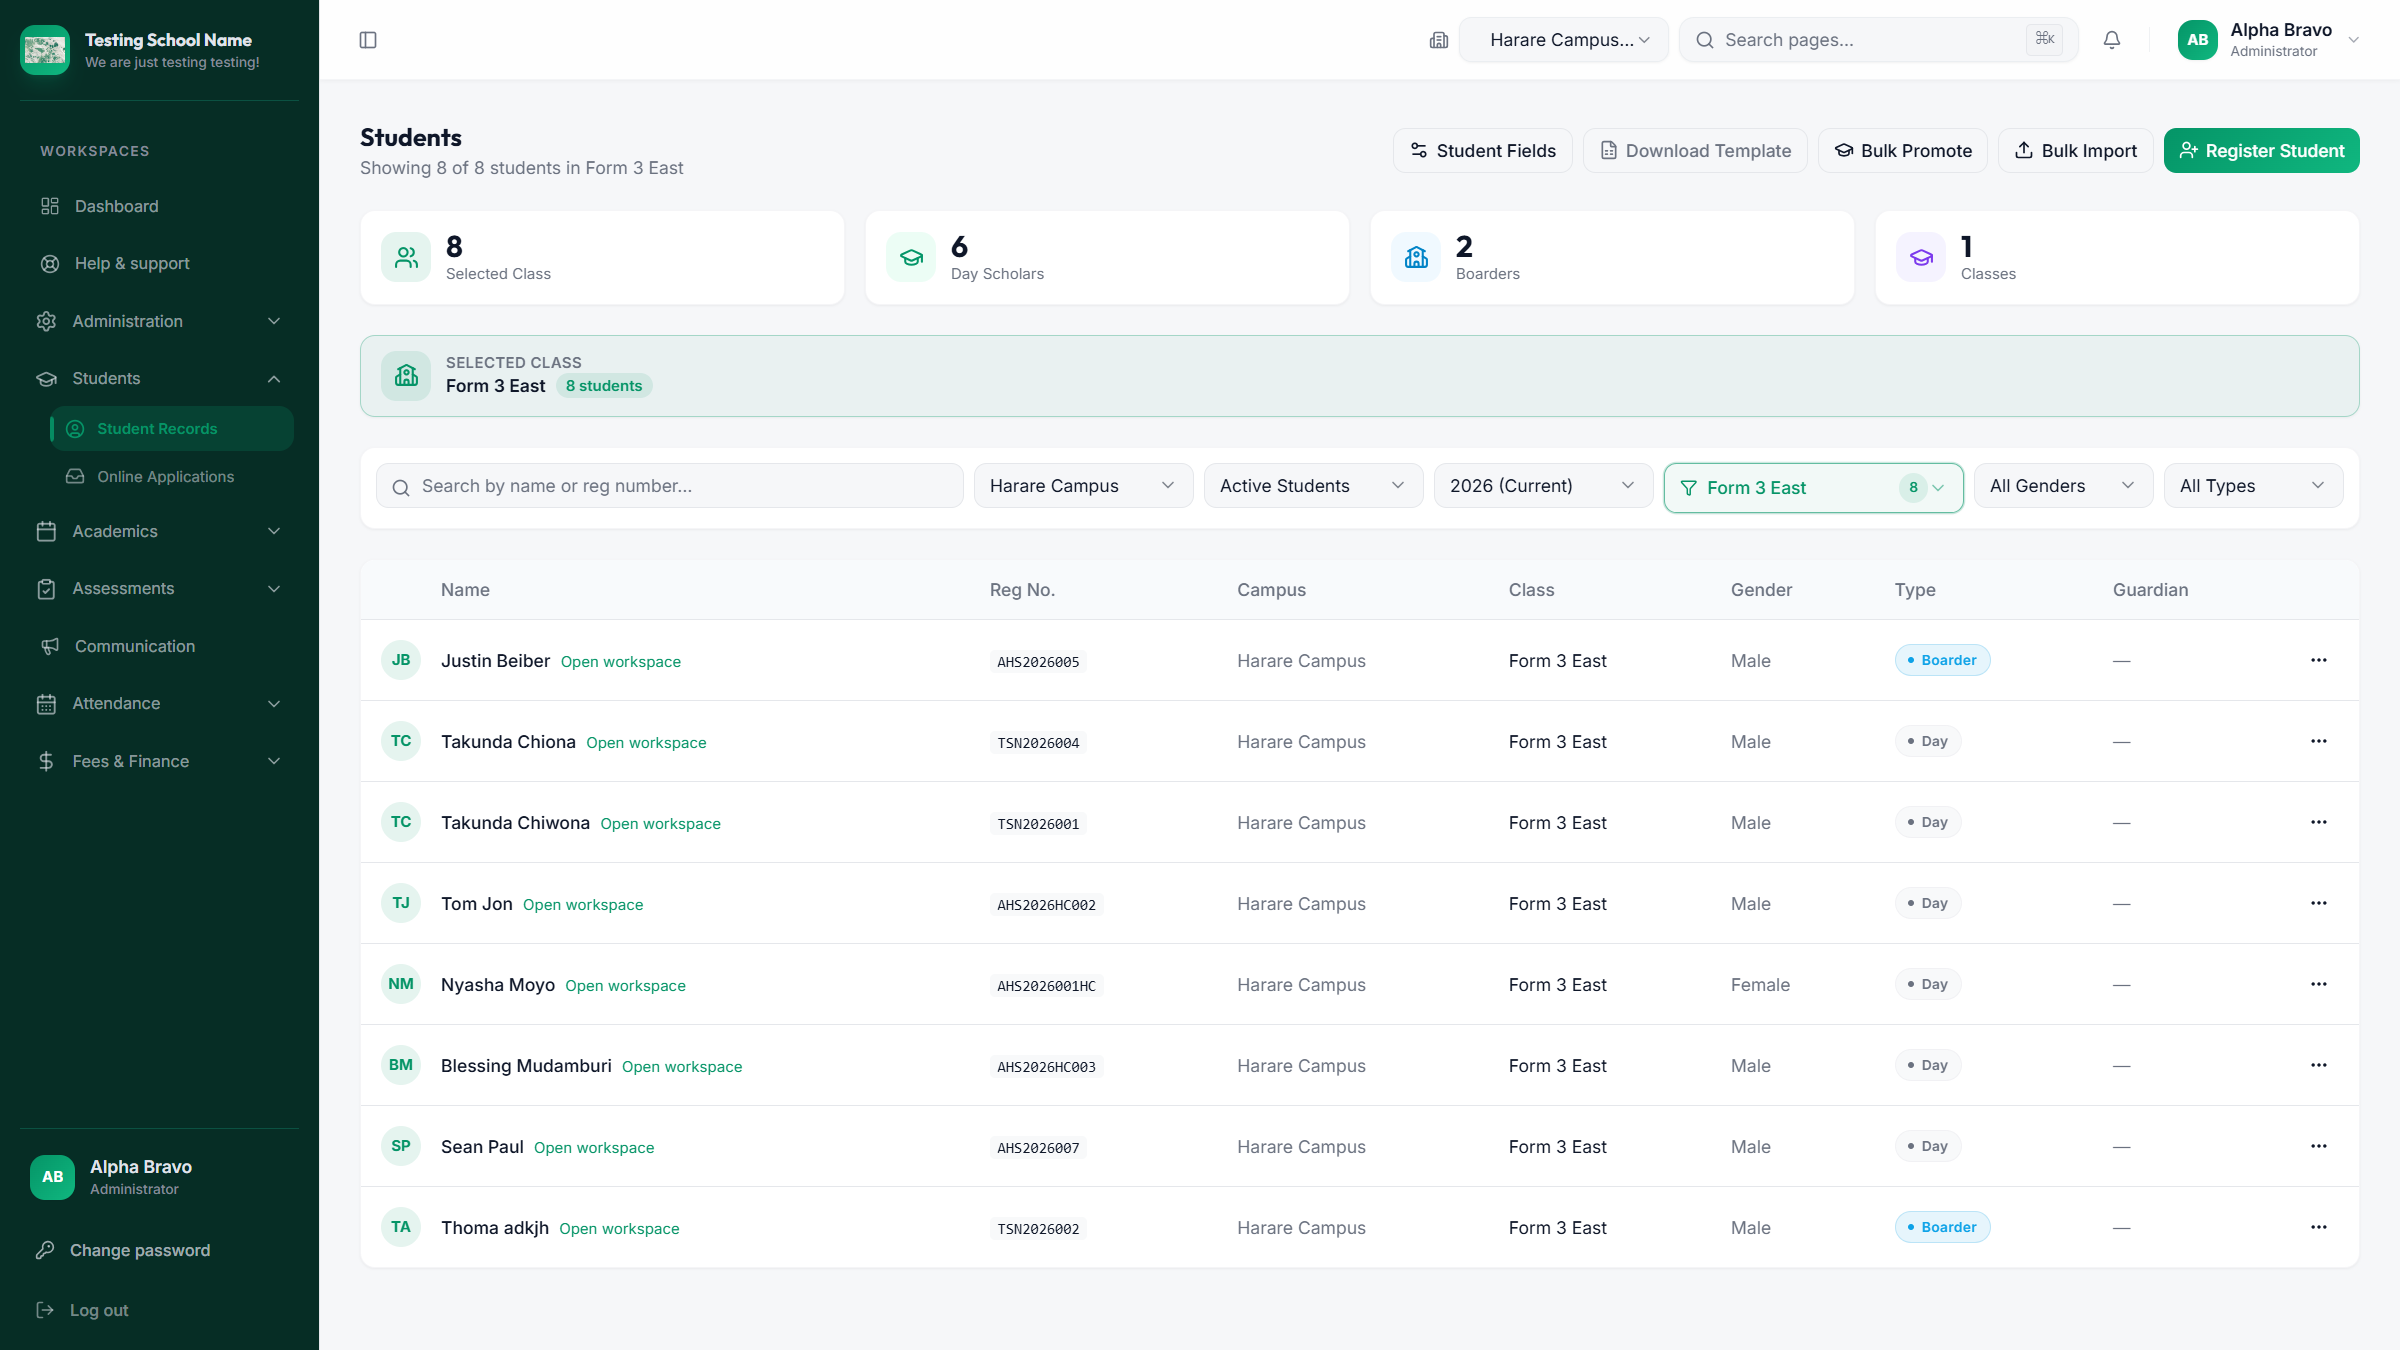
- Open Students → Student Records.
- Set campus and class so you are not mixing sites.
- Choose Register Student for one learner, or Bulk Import with the downloaded template for a class list.
- Always capture guardian name, phone, and email. Notices and invoices use that email.
- Open the learner with Open workspace to continue.
The student workspace
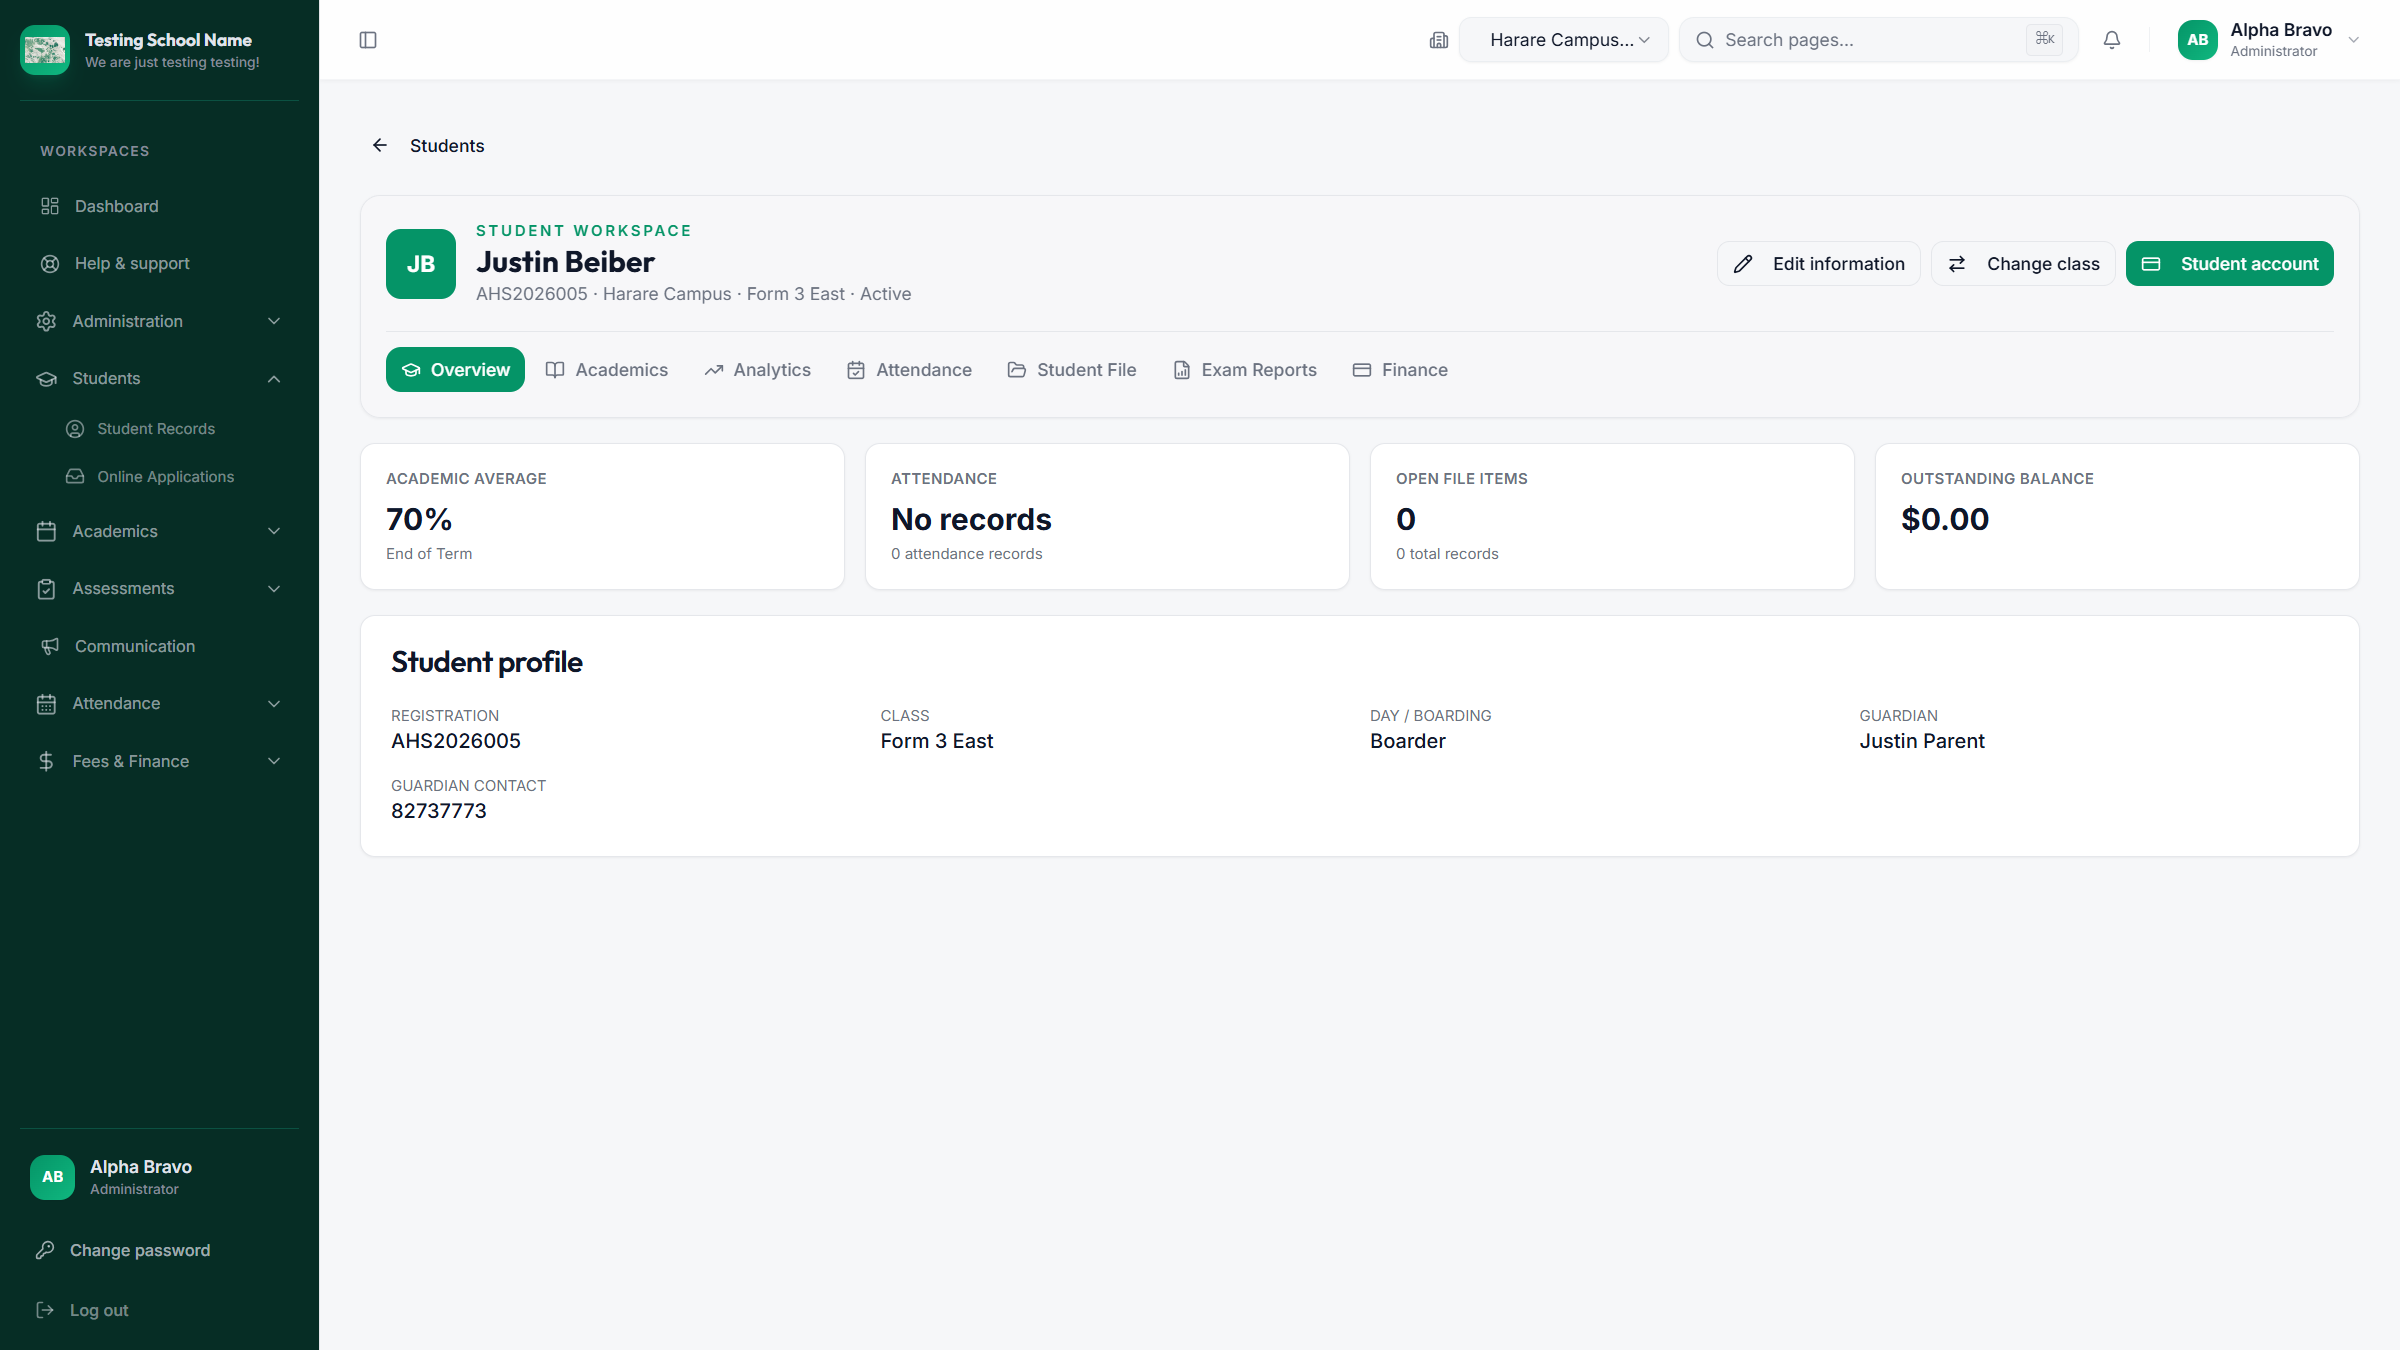
- Edit information updates identity and guardian details.
- Change class moves the learner for the current year.
- Student account issues or resets the portal login. Print the slip, hand it to the family, and tell them to change the temporary password. The password is shown once.
- Student File holds internal notes. Only share with parents when you choose that visibility.
Online applications live under Students → Online Applications. Accept or reject with a message the parent can read. Accepting can create the student account and email the registration number and temporary password.
5. Academics
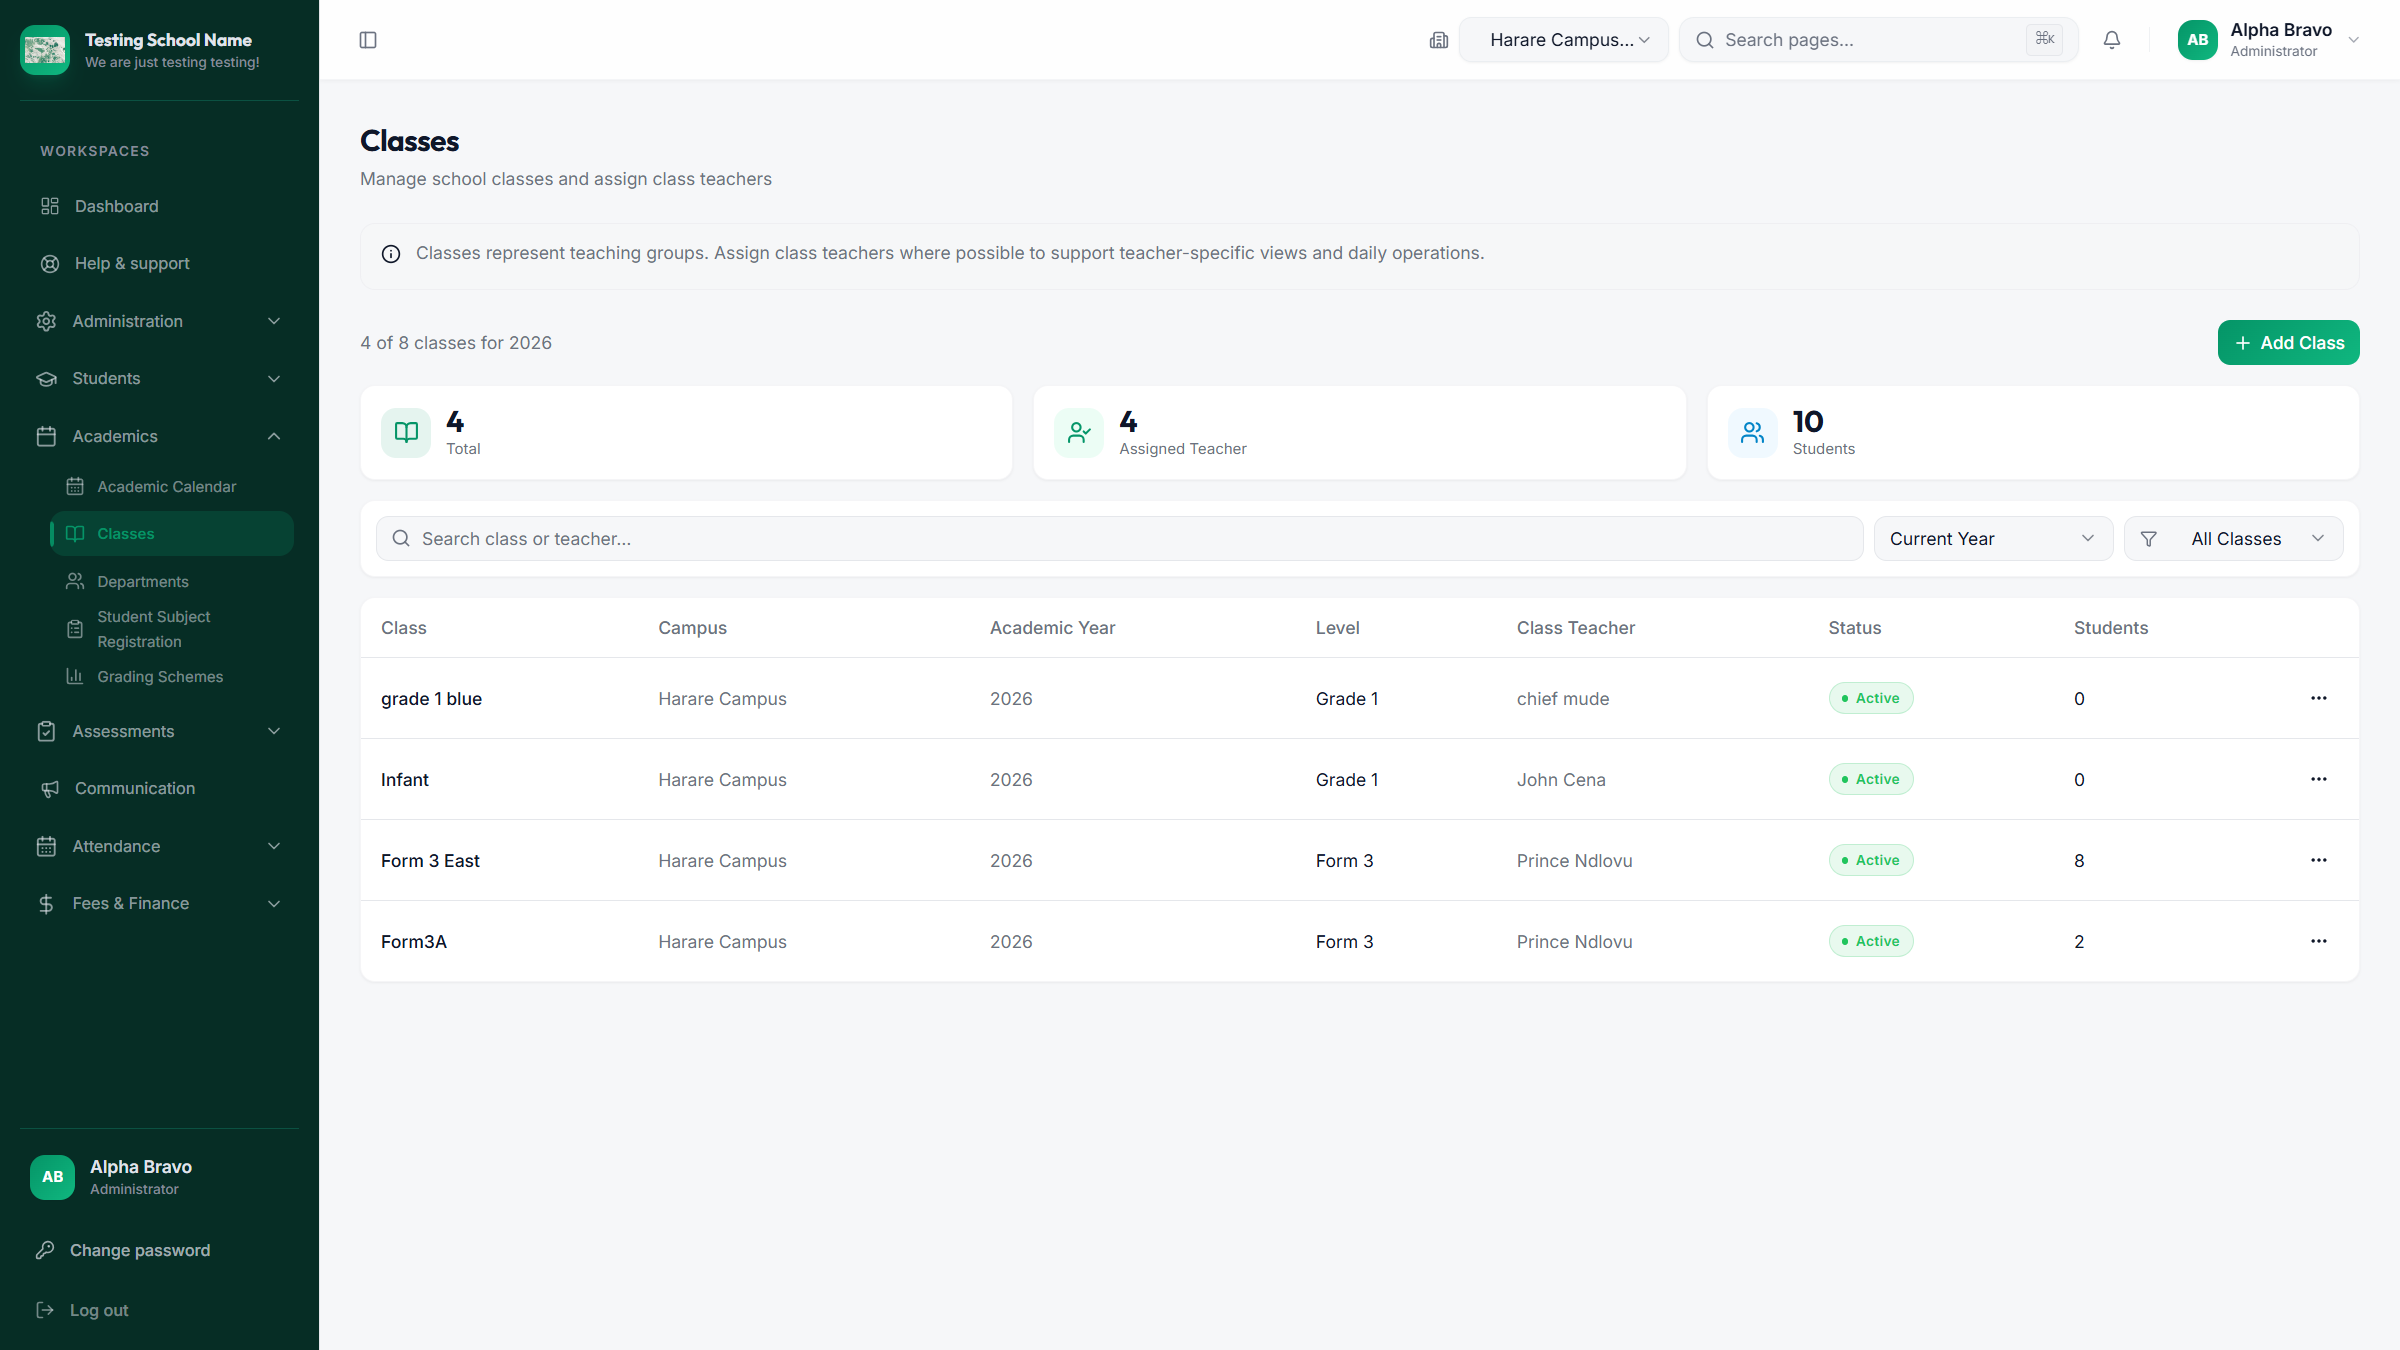
Do this in order at the start of a year or term:
- Academic Calendar — current year and current term must be set. Attendance and invoices depend on it.
- Departments — then Classes with campus, level, and class teacher.
- Student Subject Registration — place each learner on the subjects they take this term.
- Grading schemes — confirm before you create exams.
6. Attendance
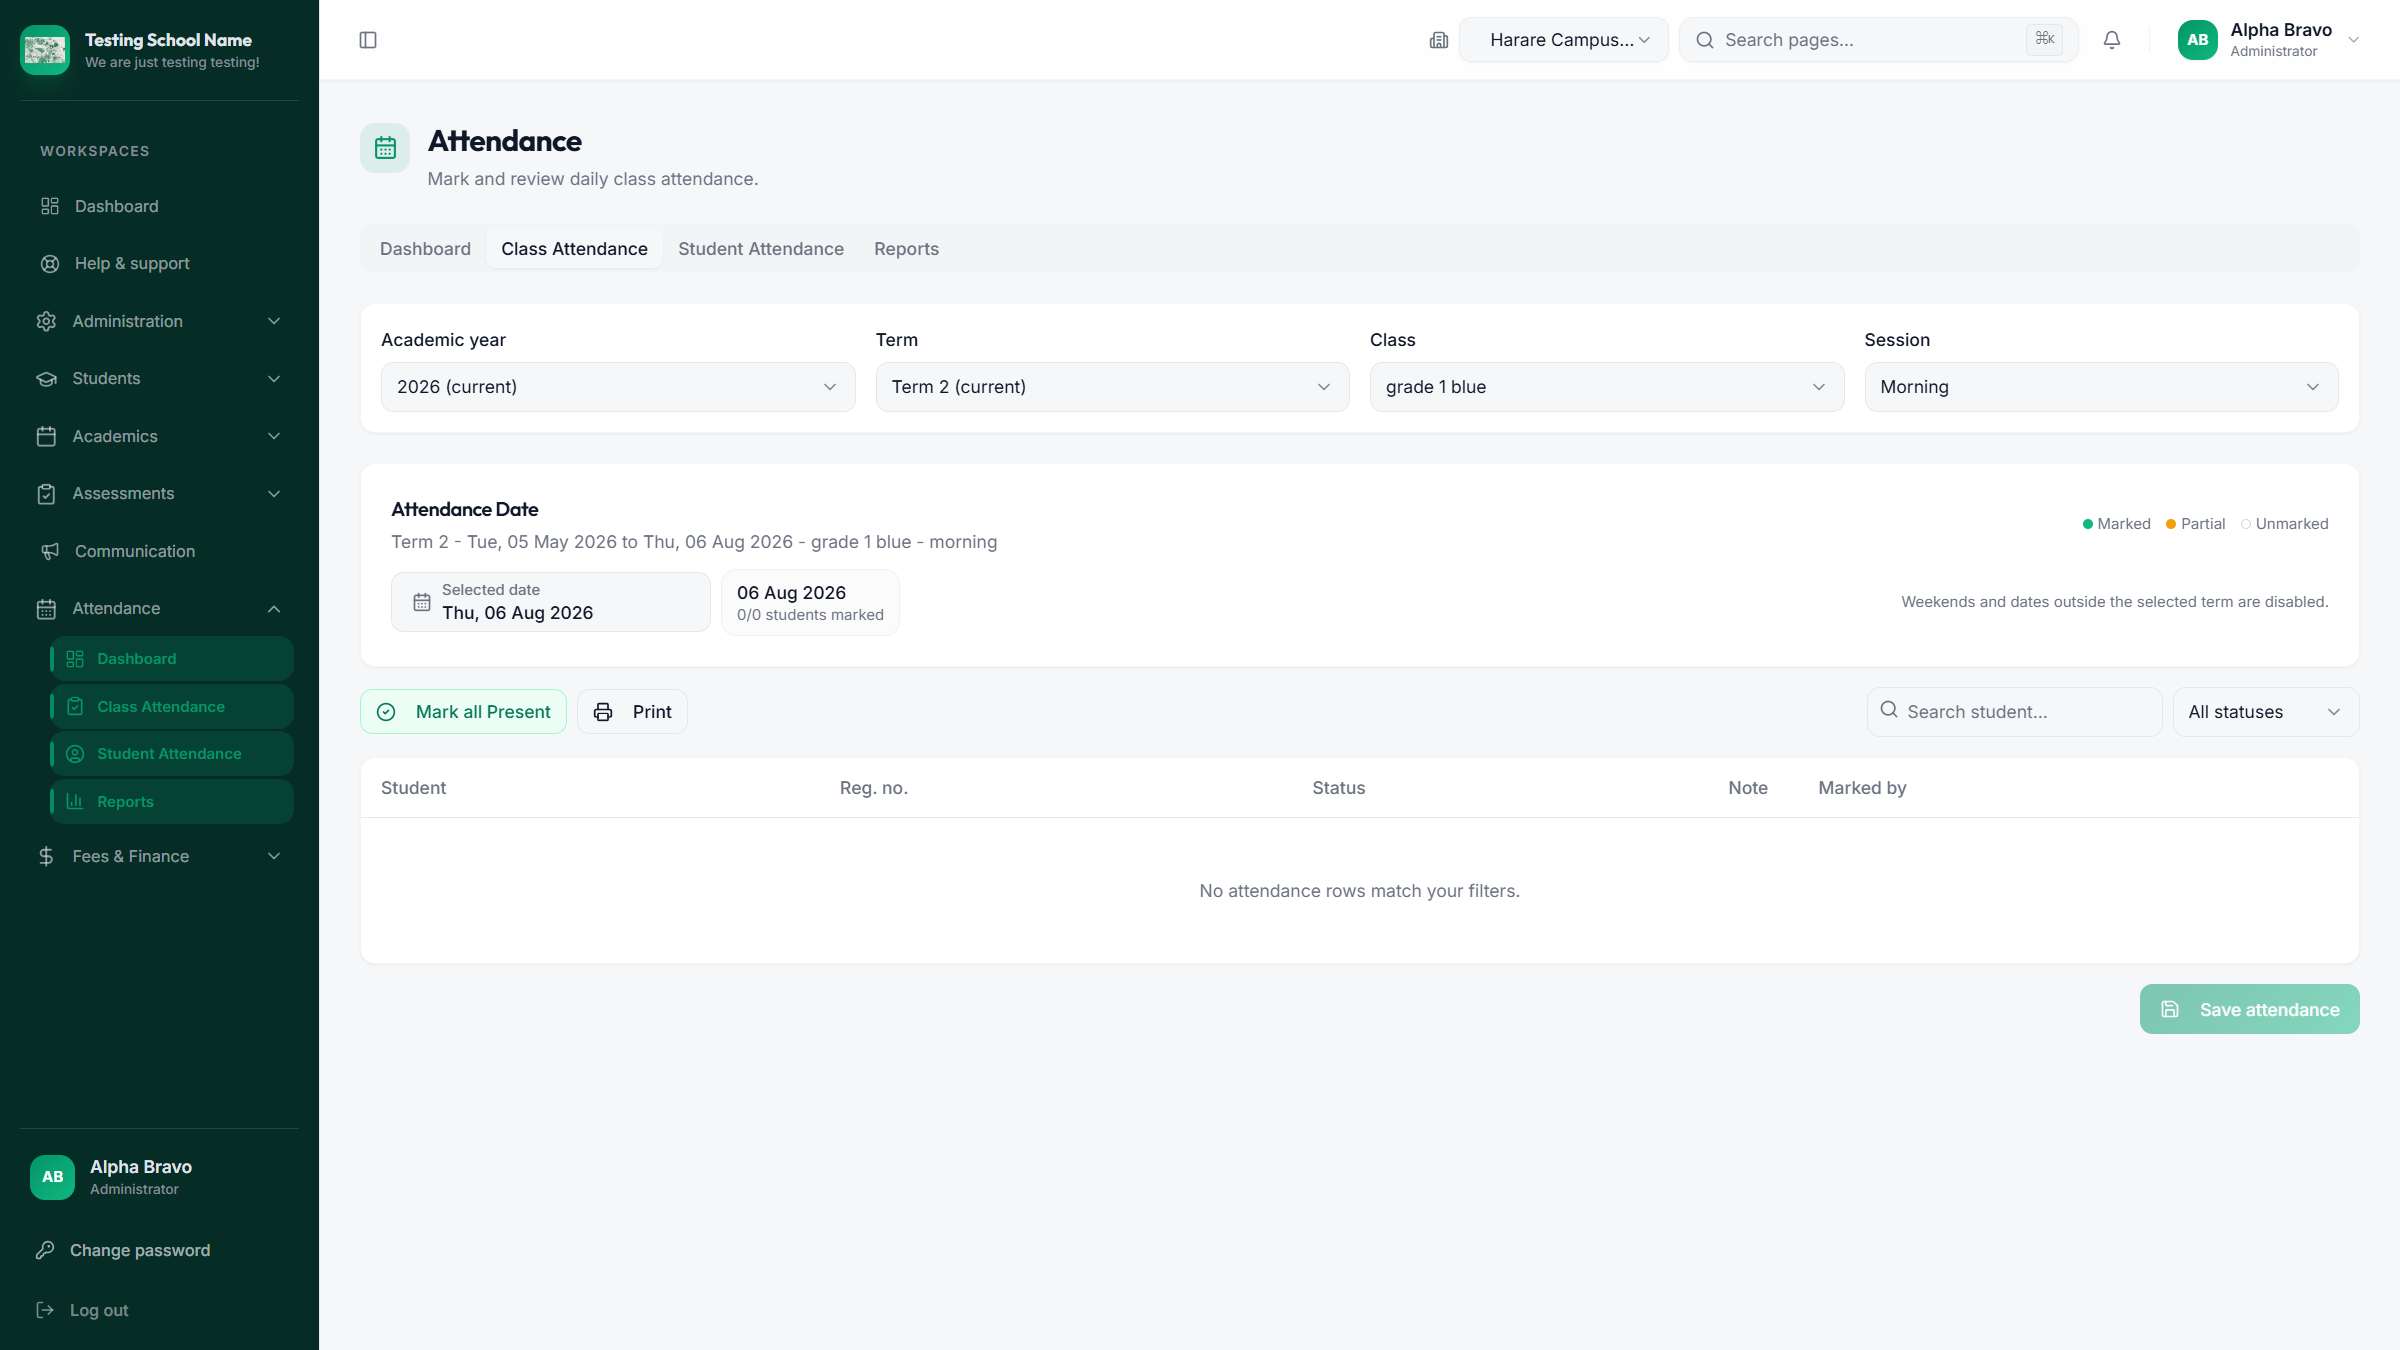
- Open Attendance → Class Attendance.
- Select the current year and term, then the class and Morning or Afternoon session.
- Pick a date inside the term. Grey dates are weekends or outside the term.
- Mark each learner, or use Mark all Present and correct absences.
- Choose Save attendance. An unsaved register is not the official record.
Use Student Attendance for one learner’s history, and Reports for class or school summaries. If RFID is enabled for your school, RFID Attendance appears in the same Attendance menu; card assignment stays with the administrator or head. Order readers and cards from the hardware store.
7. Exams, classwork and reports
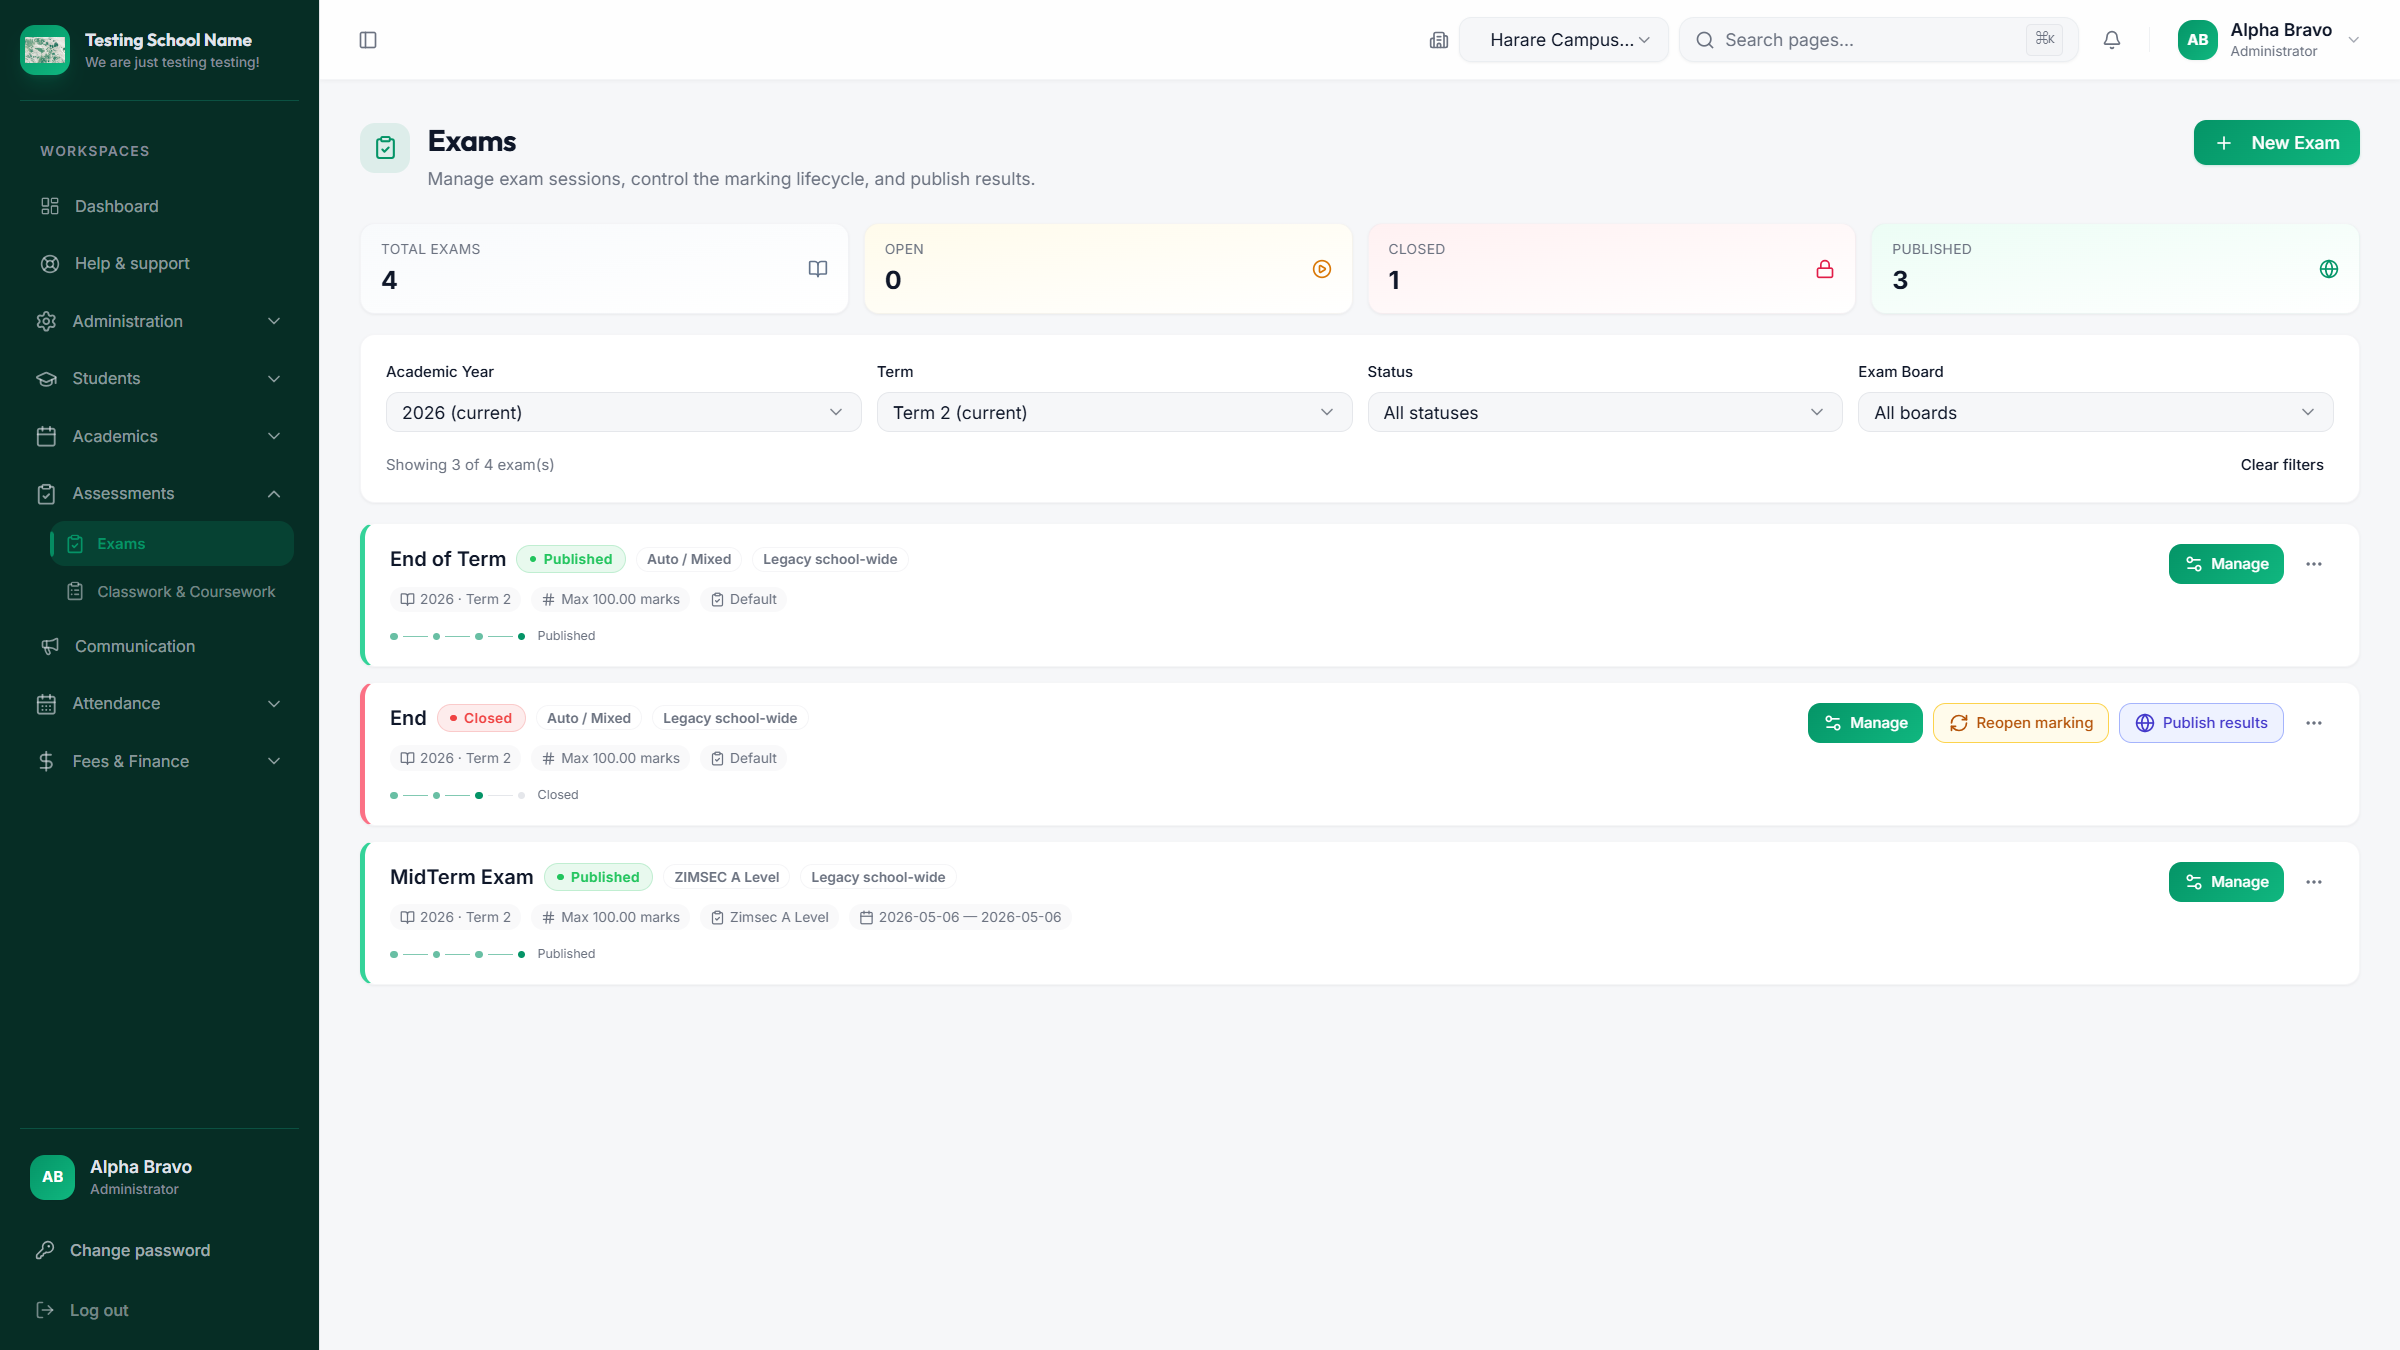
Exams
- Administrator or authorised staff: New Exam, set year, term, classes, and maximum marks.
- Teachers open Manage and enter marks for their subjects.
- When the set is complete, close marking.
- Only then Publish results. Families cannot see unpublished report cards.
Classwork and coursework
Open Assessments → Classwork & Coursework. Create homework, class exercises, tests, or projects, attach files, publish to the class, then mark returned scripts. Learners submit from the student portal or mobile app. Creating and returning work needs a live internet connection.
If the school turns on fee blocking for results, a learner who has not met the payment rule sees a clear message instead of the report. Accounts should know this before parents phone the office.
8. Fees and finance
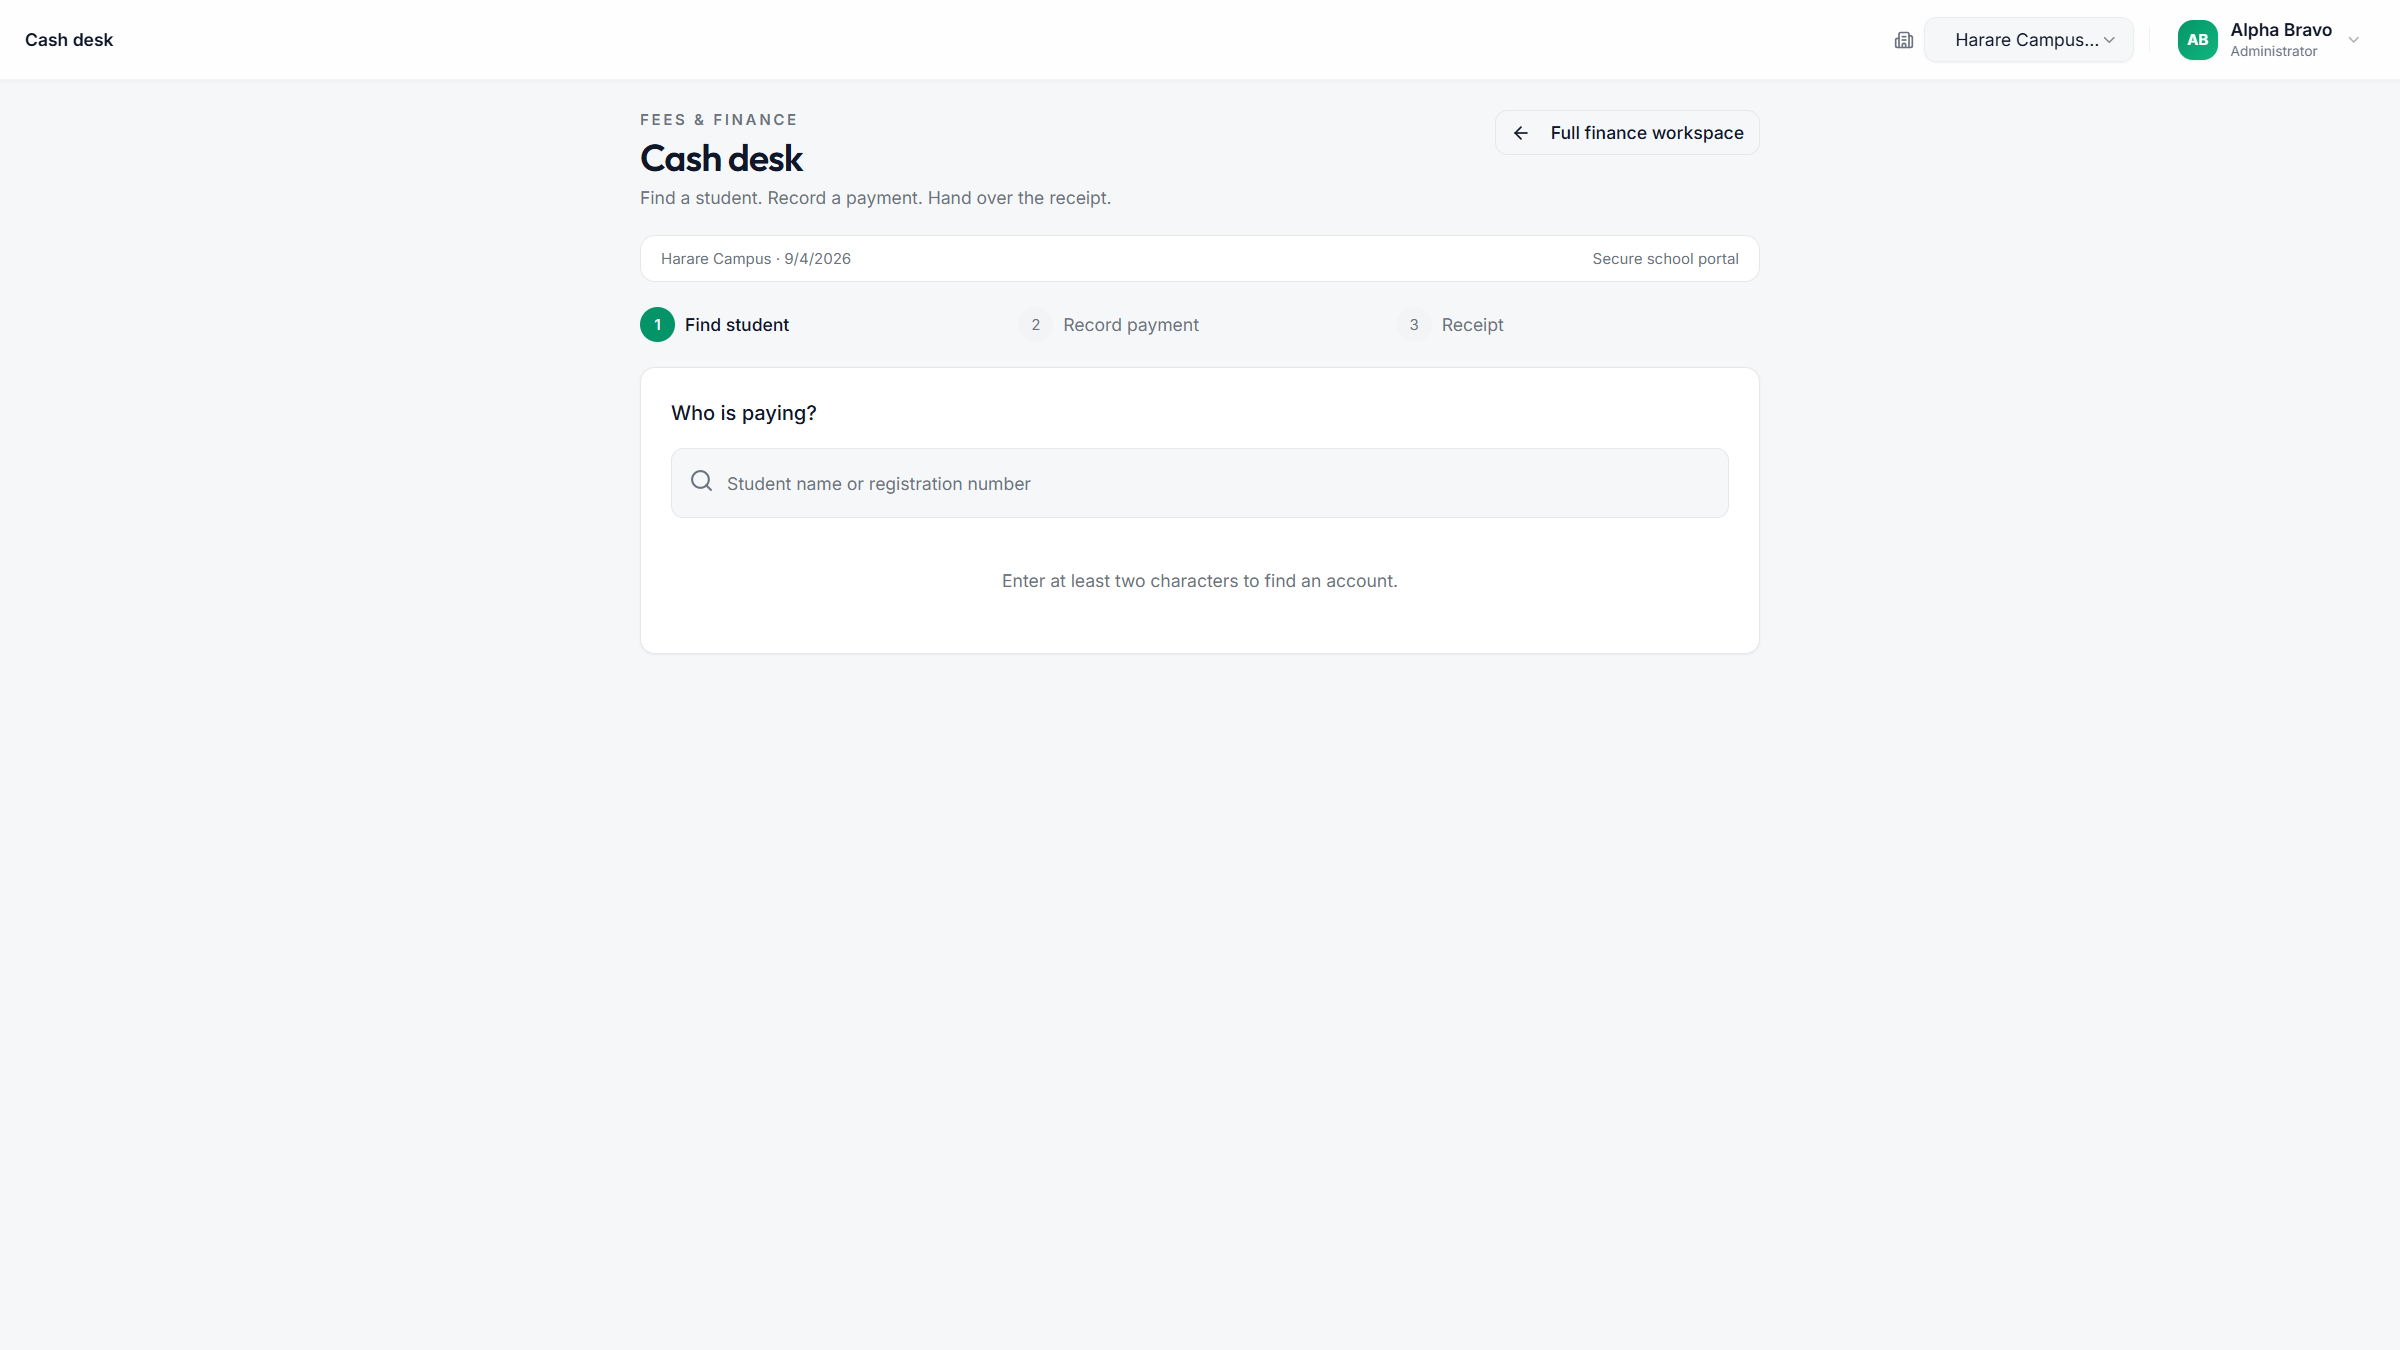
Taking money at the counter
- Open Fees & Finance → Cash desk (or Collect payment from the dashboard).
- Confirm the campus in the top bar.
- Type at least two characters of the name or registration number.
- Select the learner, enter amount and method (cash, mobile money, bank transfer, card, or cheque), and a reference if you have one.
- Save, then print or download the receipt. For a paper receipt at the counter, use a USB POS thermal printer (or a Bluetooth thermal printer when staff work away from the desk). Compatible printers are listed in the hardware store.
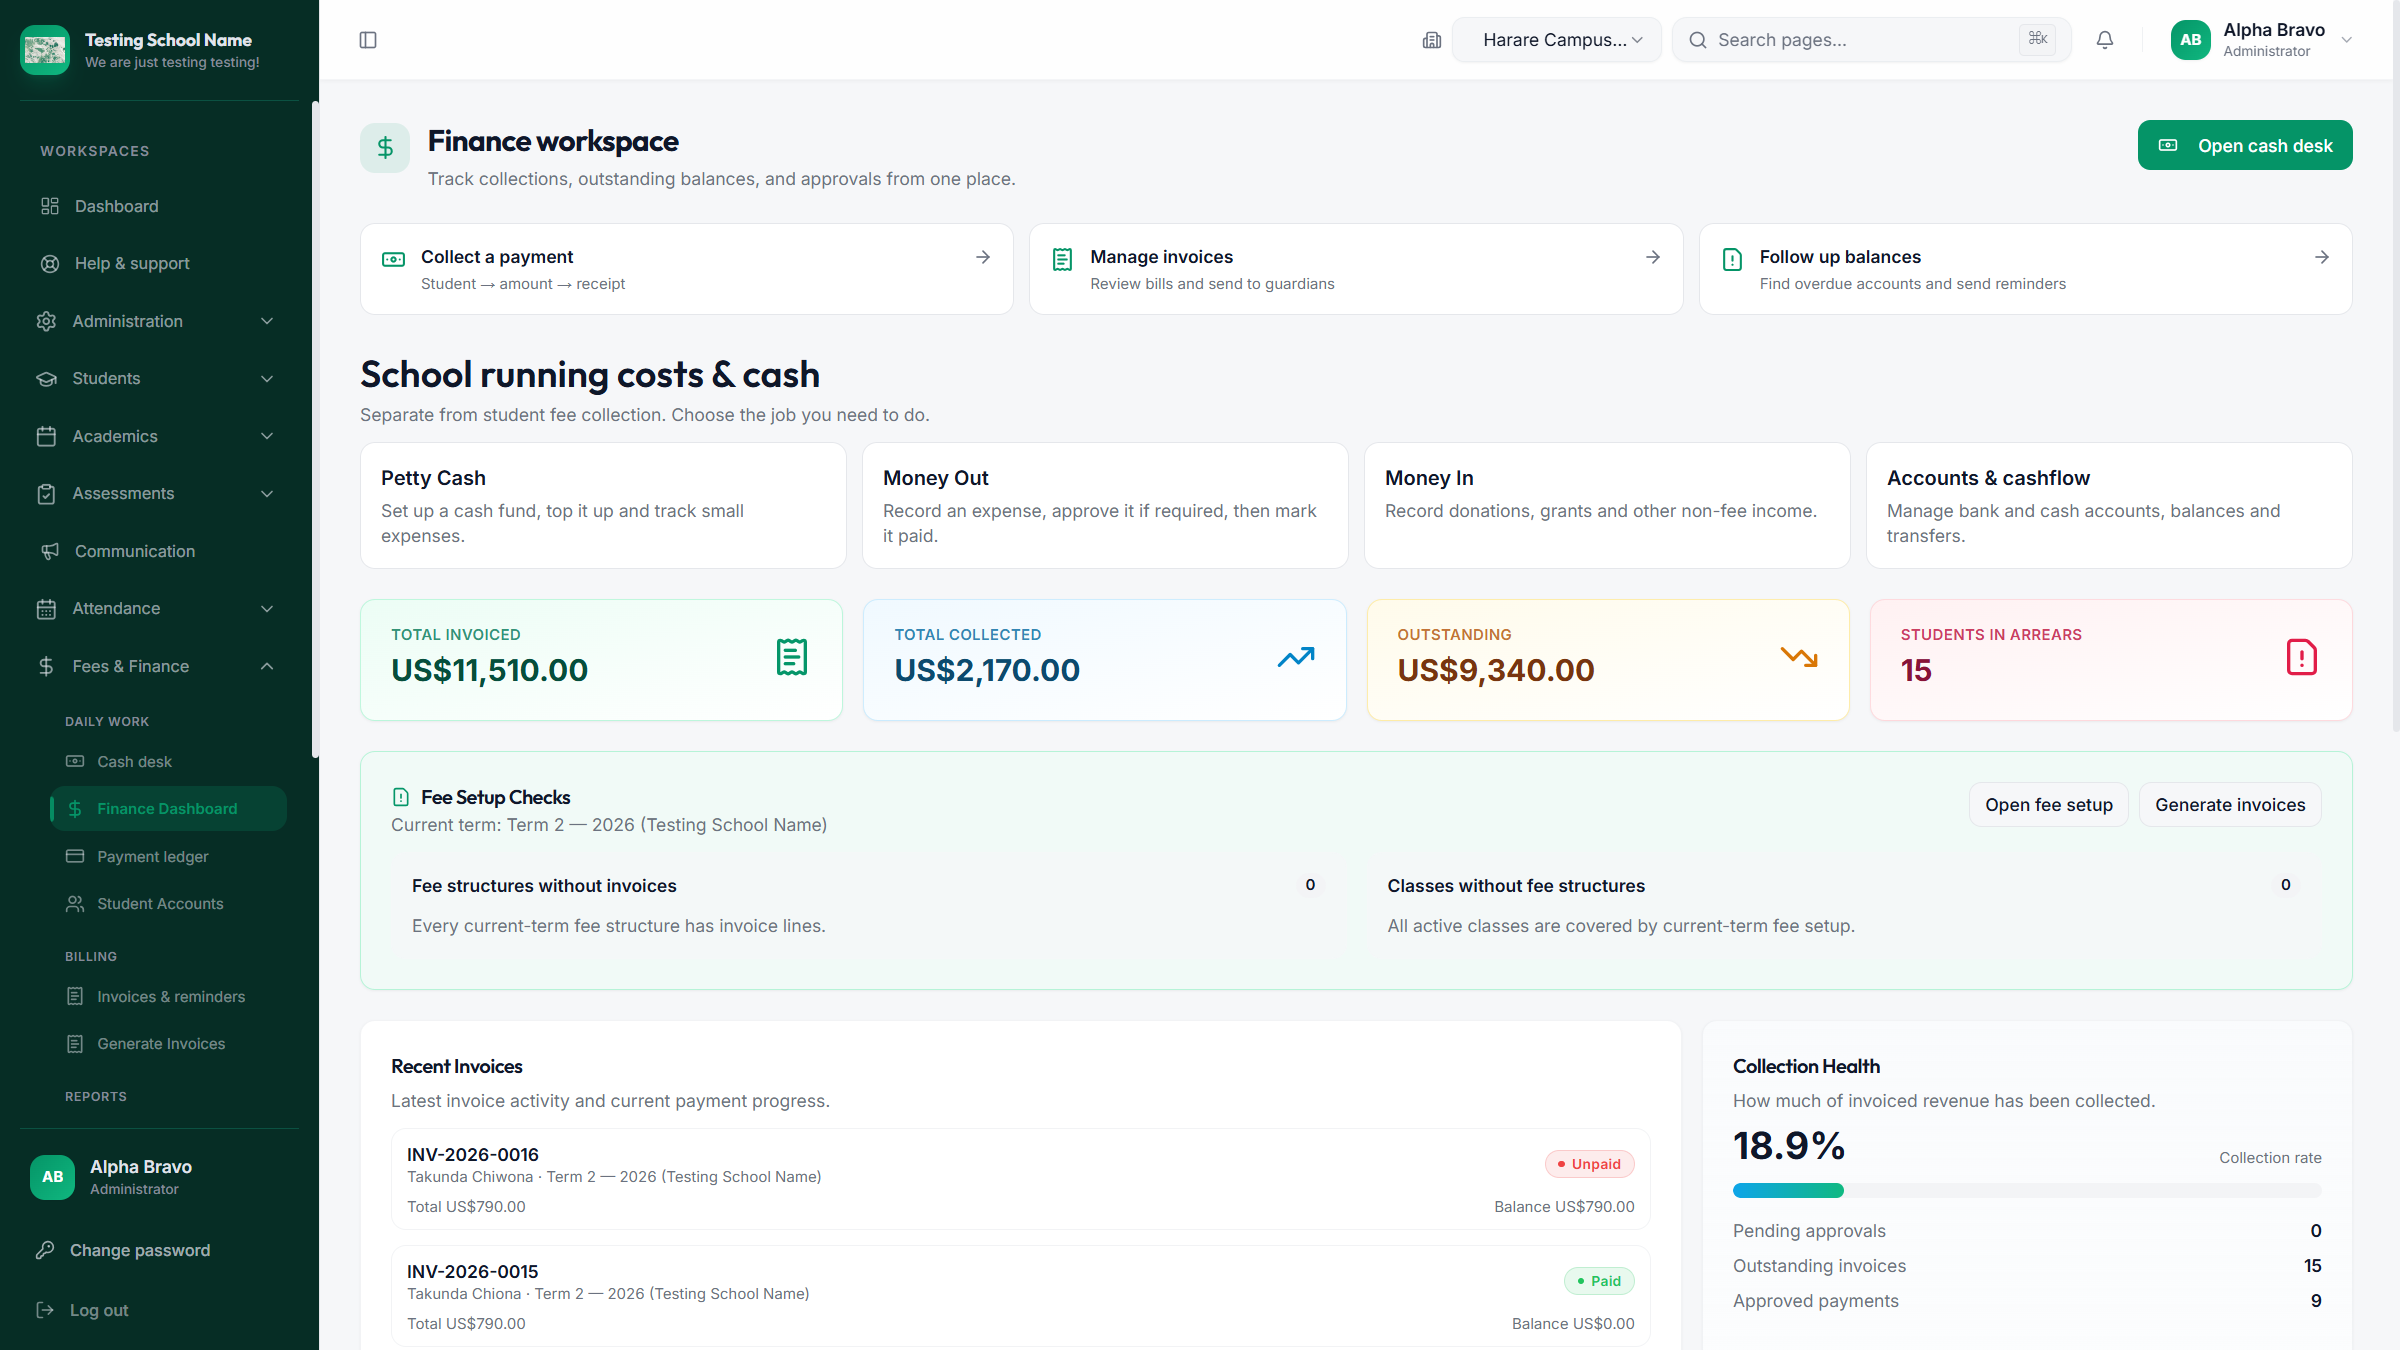
Billing work
| Screen | Use it to |
|---|---|
| Set Up Fees | Build fee groups (for example all boarders, a class, or a level) and fee items for the term. |
| Generate Invoices | Preview who will be billed, then create the term invoices. One invoice per student per term. |
| Invoices & reminders | Review bills and send them to guardian emails. |
| Payment ledger | Approve proof-of-payment uploads from the student portal. Pending is not yet on the balance. |
| Student Accounts | See a learner’s running balance. |
| Outstanding / Collections reports | Follow up arrears and report what has been collected. |
9. Communication
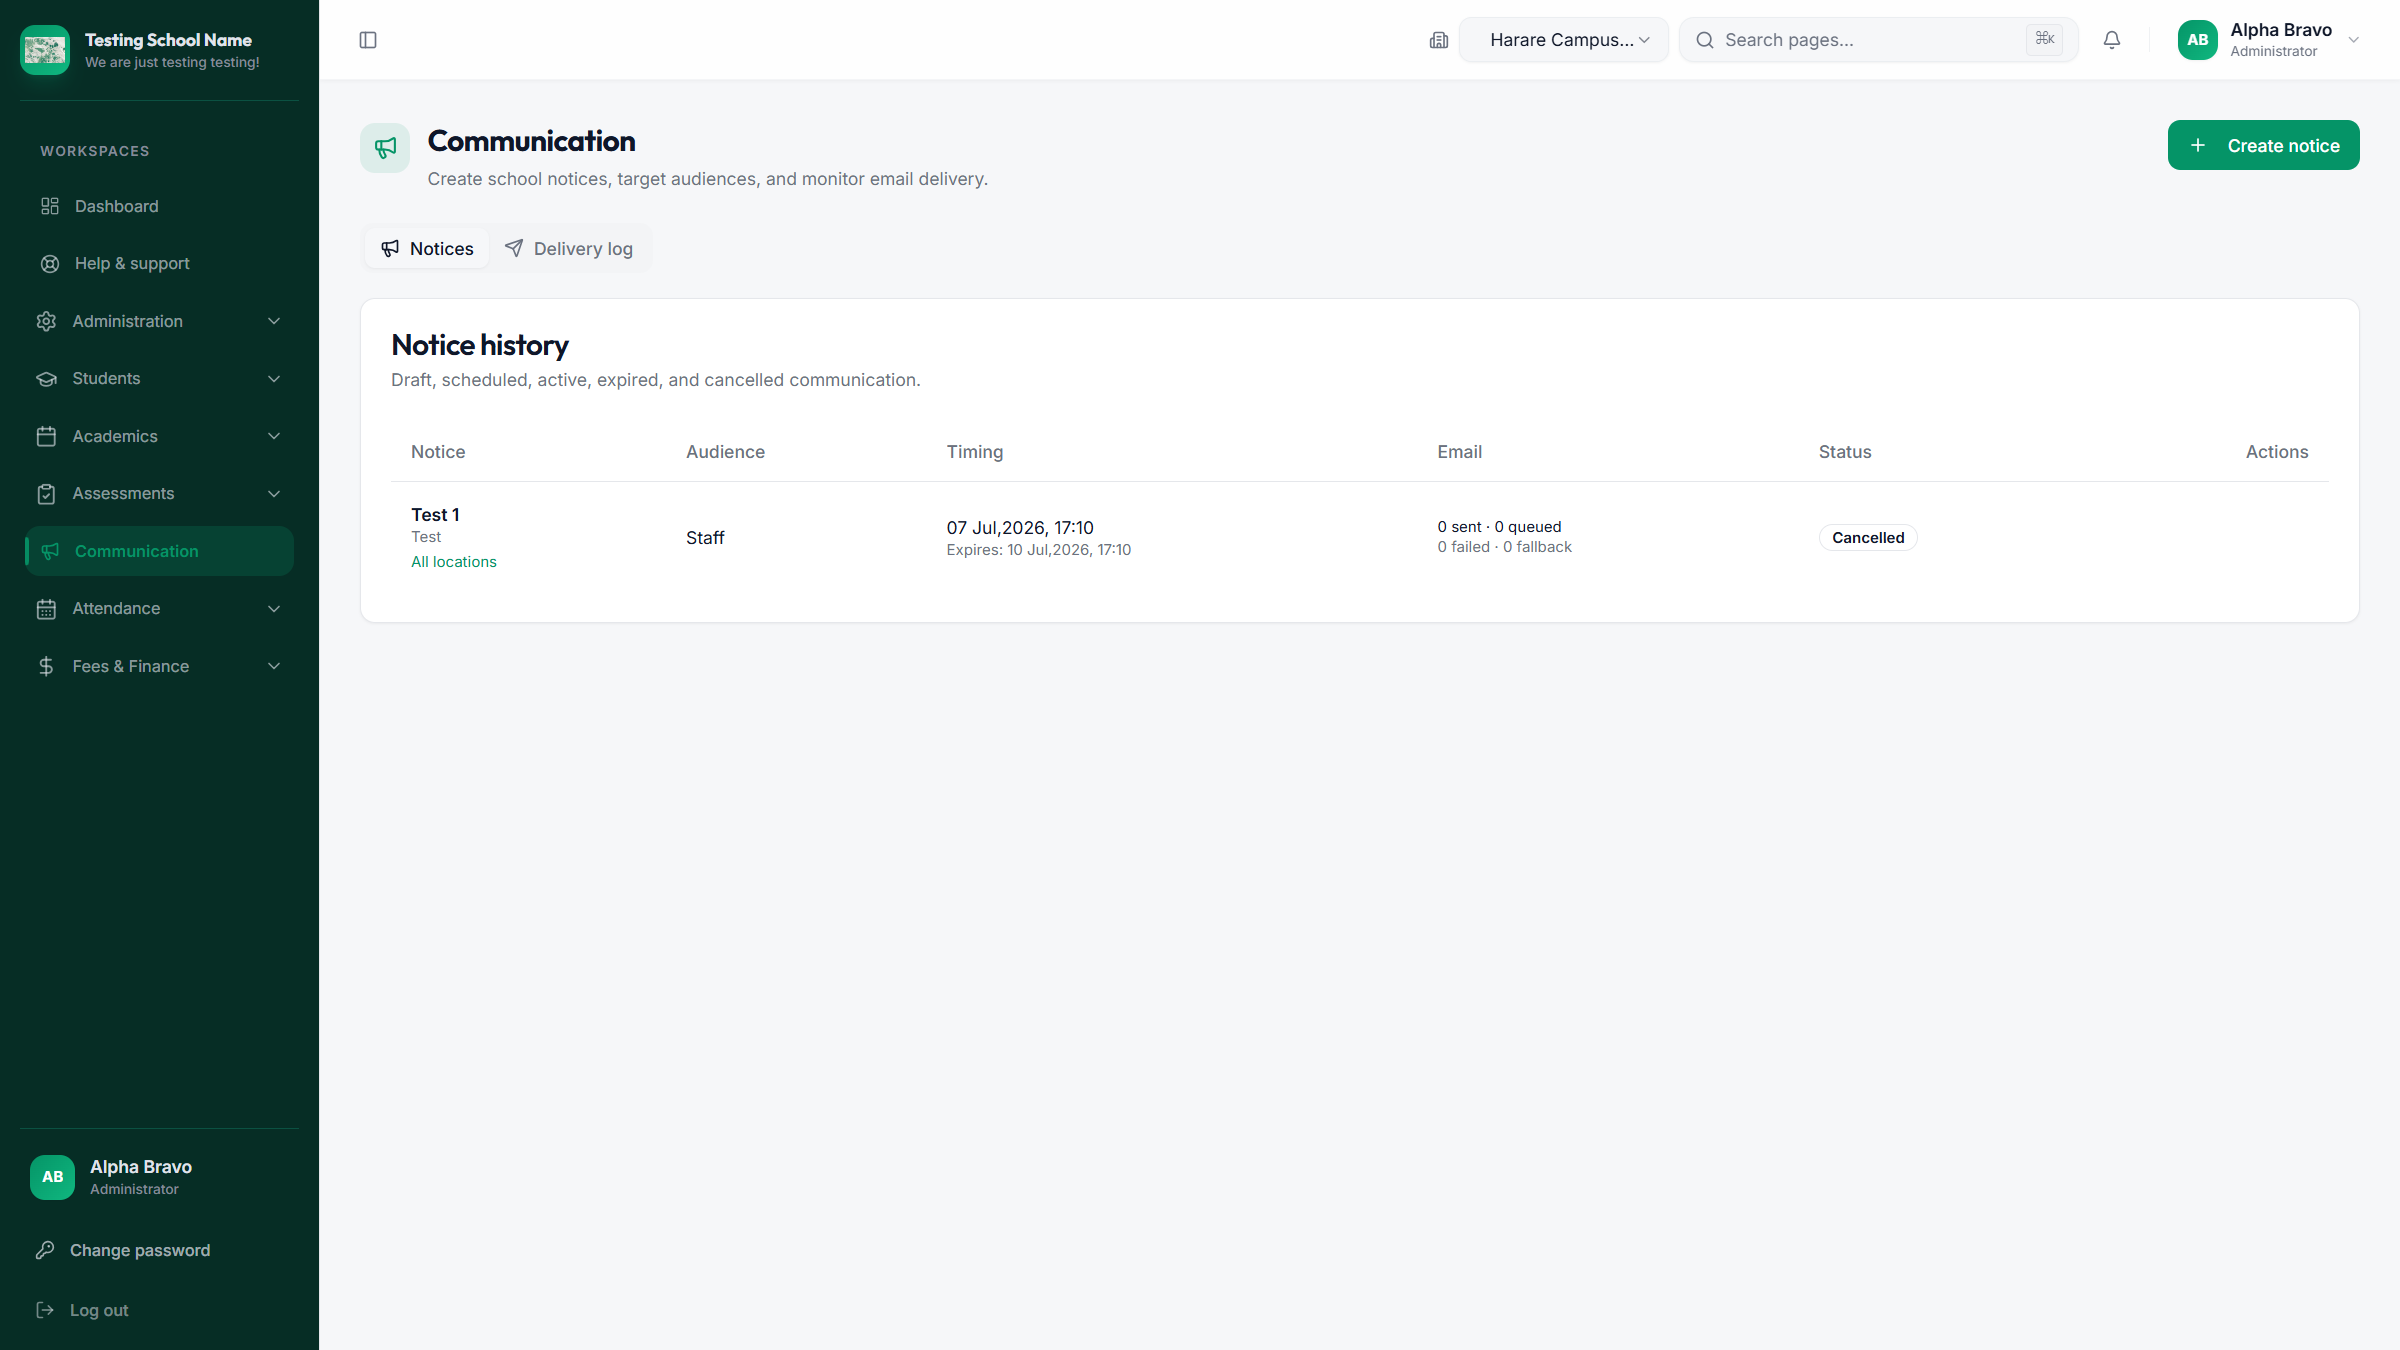
- Open Communication (administrator or headmaster).
- Create notice, write the message, choose audience, optional classes or roles, and campus if asked.
- Publish or schedule. Notices appear on matching dashboards even when email is off.
- Use Delivery log if email was expected and did not arrive — often the guardian email is blank.
SMTP and sender addresses are under Communication email setup, administrator only. Send a test to yourself before a whole-school notice.
10. Staff users and settings
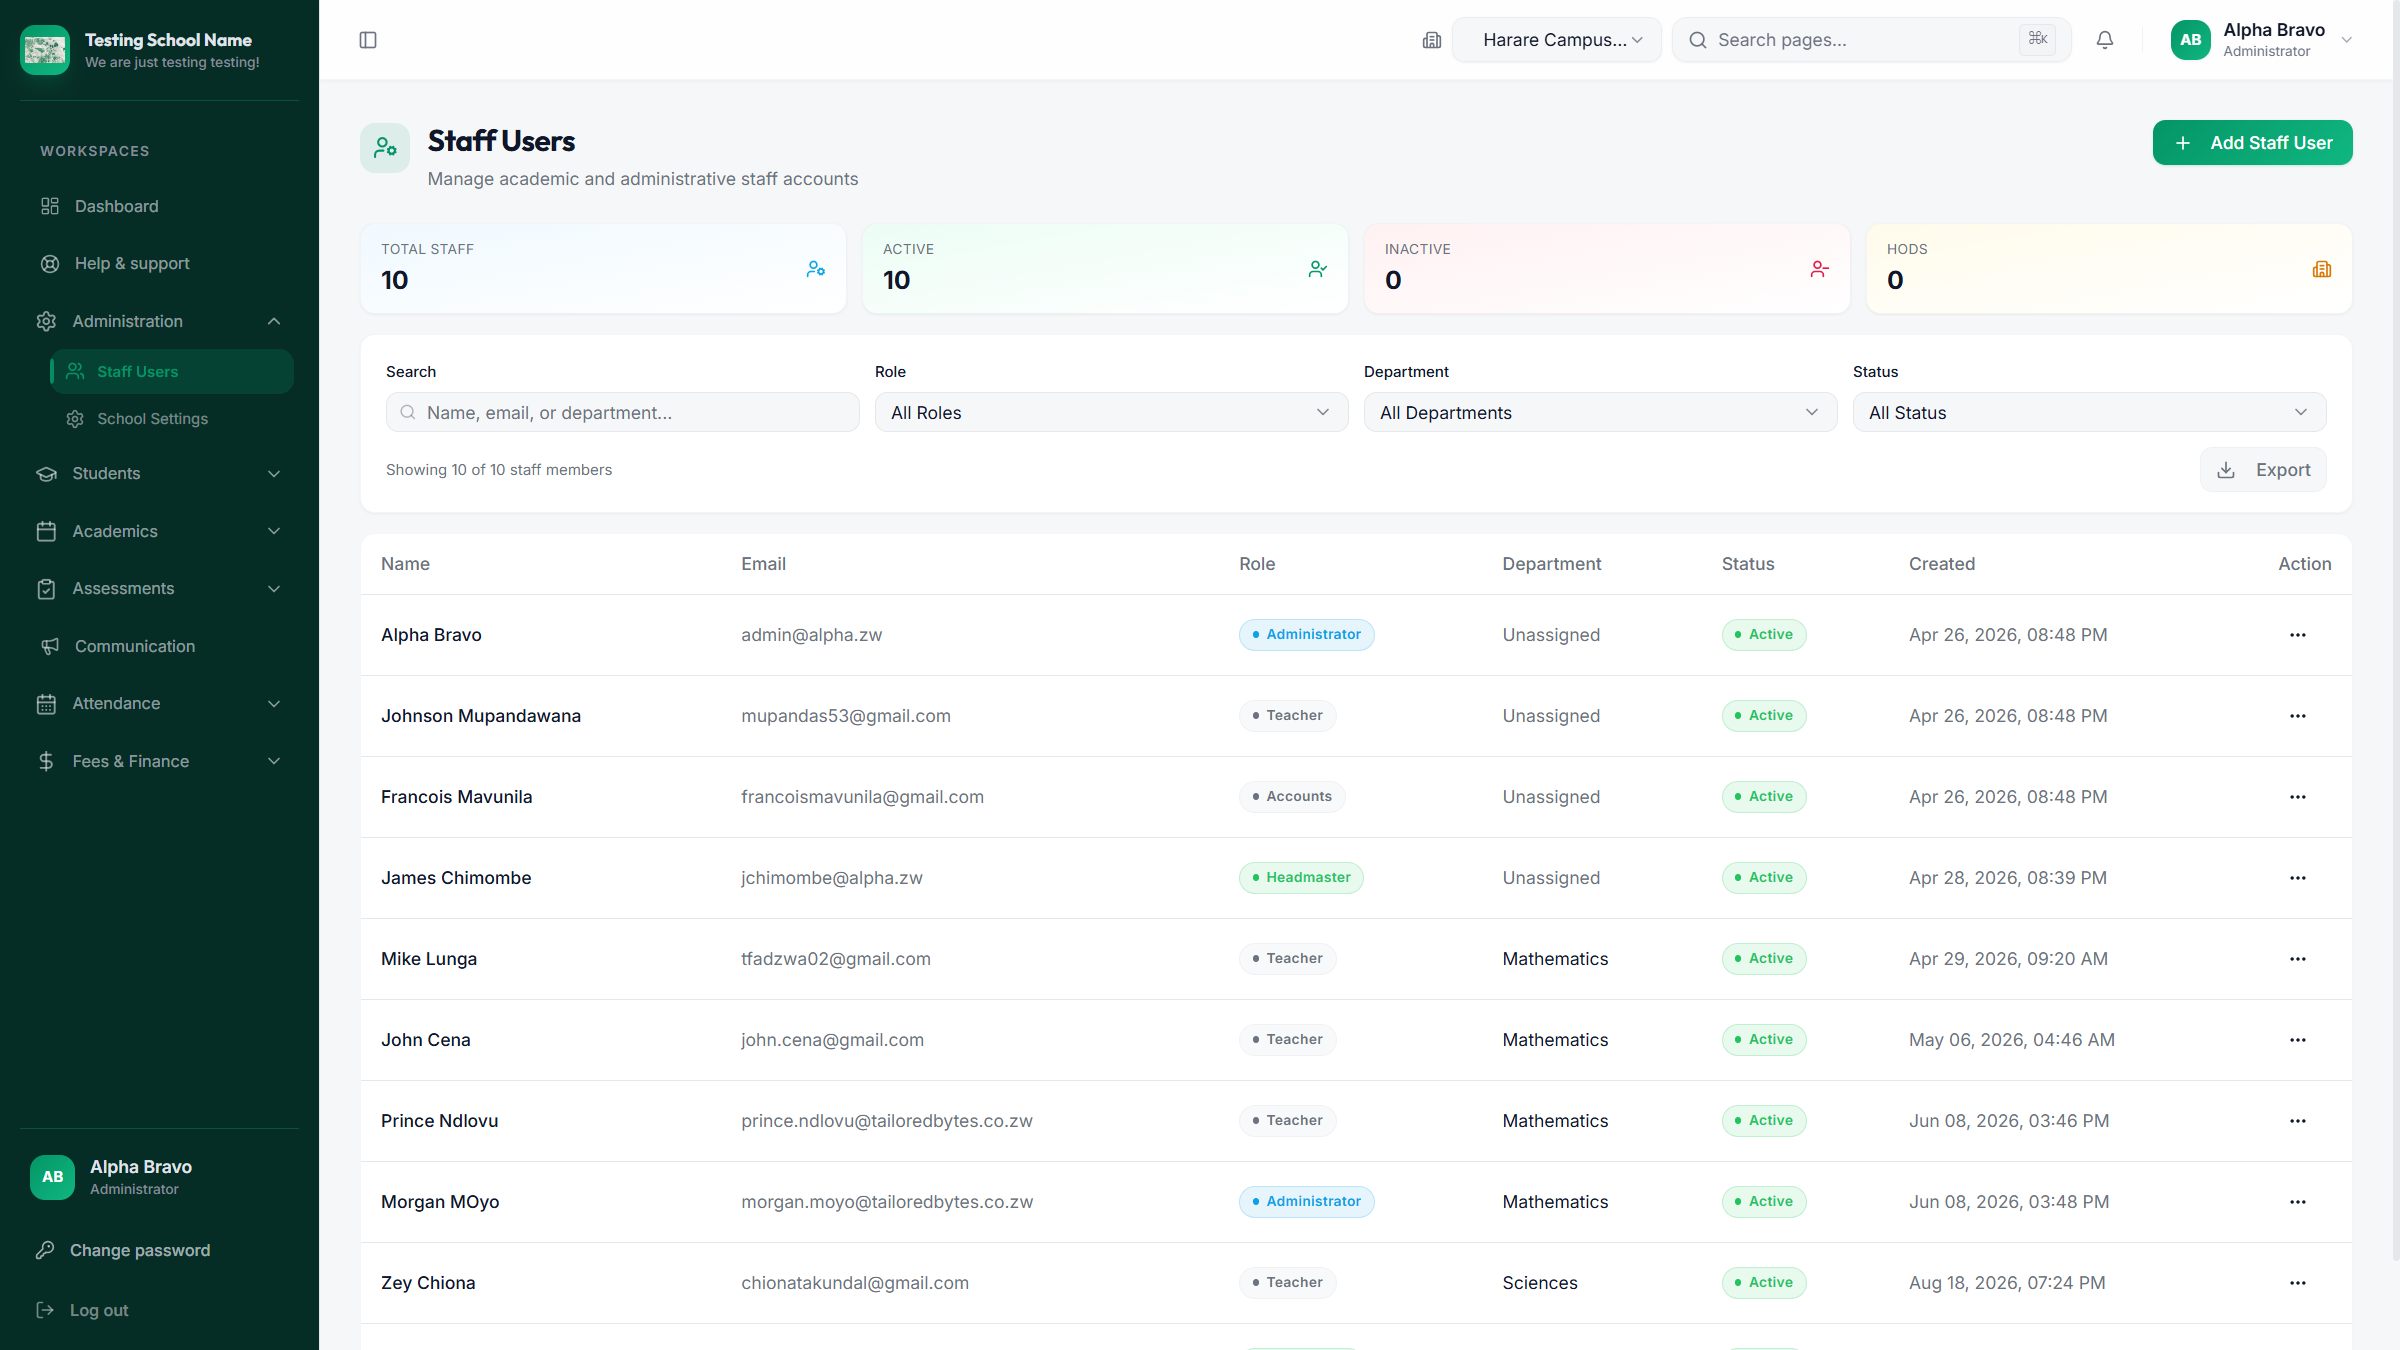
- Administrator: Administration → Staff Users → Add Staff User.
- Choose role and department for teachers and HODs.
- Leave the password blank to generate a temporary one. The colleague must change it after login.
- Use the row menu to reset a password later. Do not write passwords on a shared whiteboard.
School Settings holds branding, campuses, modules, RFID (if entitled), and finance options such as blocking reports when fees are owing. Do not turn modules off during the school day without telling staff.
11. Mobile app
Install Tailored School from the school’s Android release or store listing.
- Search the school name, then sign in with the same staff email.
- Teachers: open an assigned class, mark attendance, and leave the phone on until sync finishes if you were offline.
- Homework create, submit, and return need internet.
- Staff attendance kiosk (if enabled) is run by an authorised admin on the device — individual staff do not log in to clock in.
12. Office computer without internet
If the school has ISMS Edge installed, open ISMS Desktop from the Start menu. Sign in with your school password, or the offline PIN set on that computer under Edge Sync.
- Closing the window does not stop the local services. Use the tray icon to open the portal again.
- Take payments as usual at cash desk. Receipt numbers stay the same after sync.
- Ask the local administrator to back up Edge data regularly. Logs and backups live under ProgramData on that PC.
13. If something goes wrong
| Problem | What to try |
|---|---|
| Cannot sign in | Confirm Staff Portal tab, email spelling, and Caps Lock. Use Forgot password or ask Admin to reset. |
| Wrong campus data | Change the campus selector in the top bar, then refresh the list. |
| Empty attendance class | Confirm current term, class teacher assignment, and that learners are in that class for the current year. |
| Families cannot see reports | Confirm the exam is Published, not only Closed. Check fee-blocking settings and the learner balance. |
| Payment not on the statement | If it was a portal upload, approve it on the payment ledger. If it was cash desk, search the receipt number. |
| Notice not emailed | Check guardian email on the student record and Communication → Delivery log. |
| Portal expired or suspended | Contact the school administrator, then Tailored Bytes for subscription help. |
In-portal: Help & support. Vendor: [email protected] · tailoredschool.com/contact.
Give the date, your name, role, what you clicked, and a screenshot. Do not include passwords.